-
Announcement
Welcome to M1GC
-
Posts
1053 -
Joined
-
Last visited
-
Days Won
26
Content Type
Profiles
Forums
Gallery
Blogs
Store
Downloads
Events
Everything posted by M1GC
-
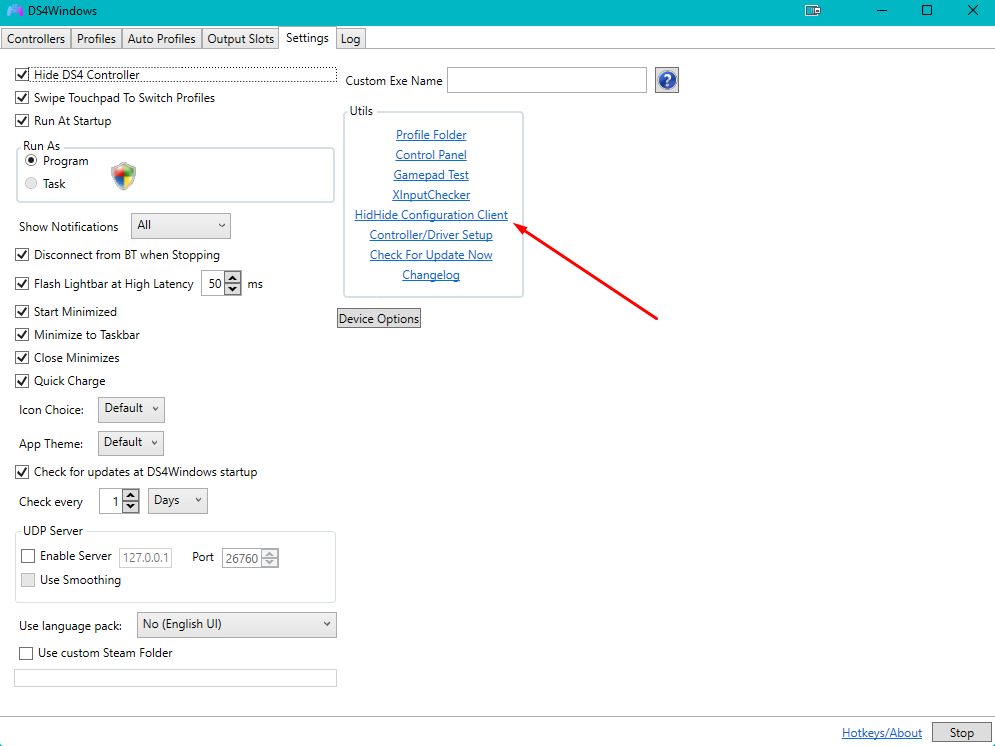
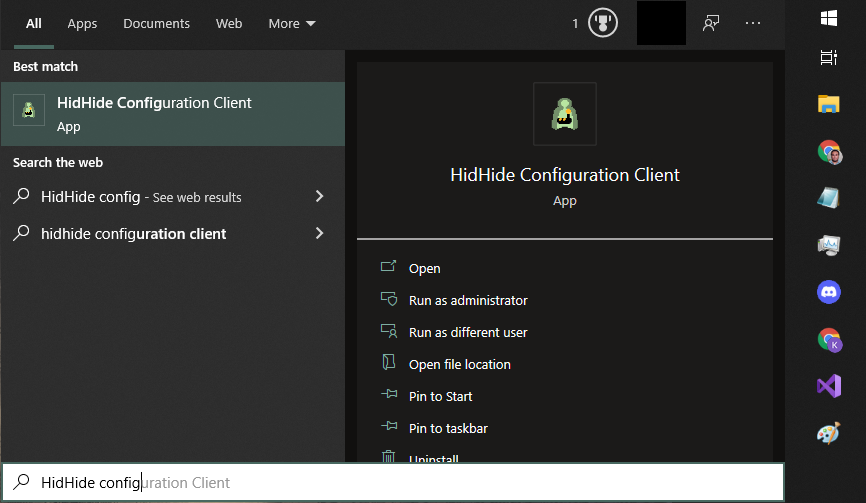
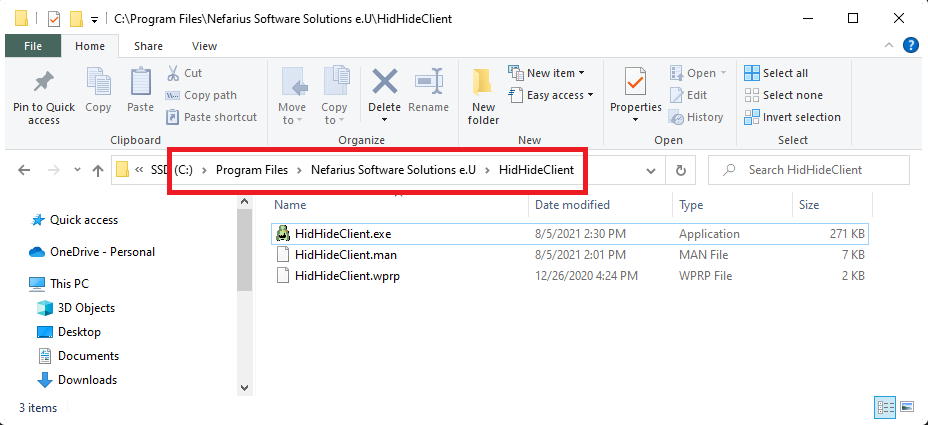
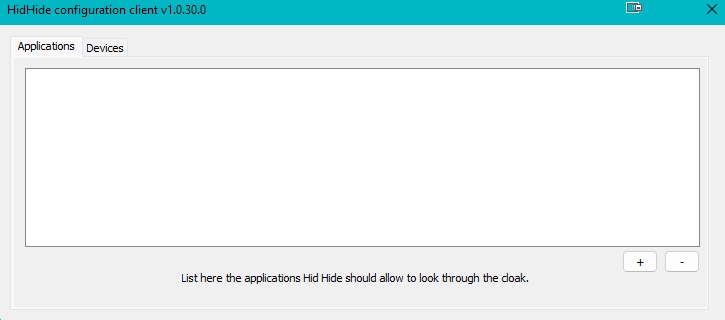
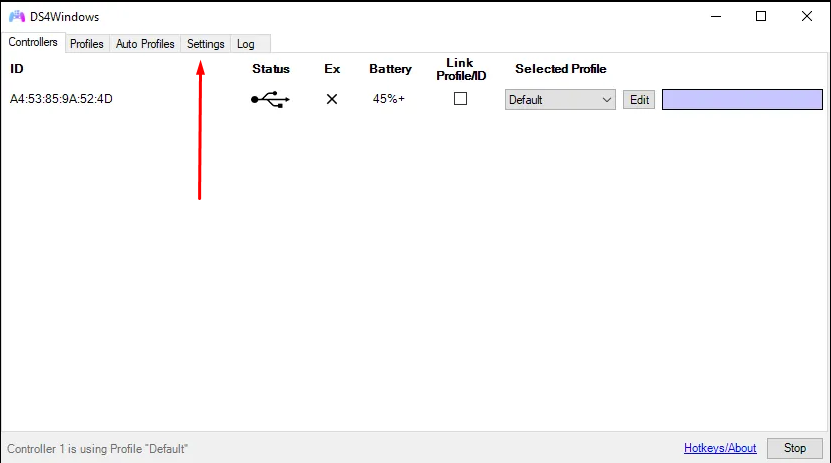
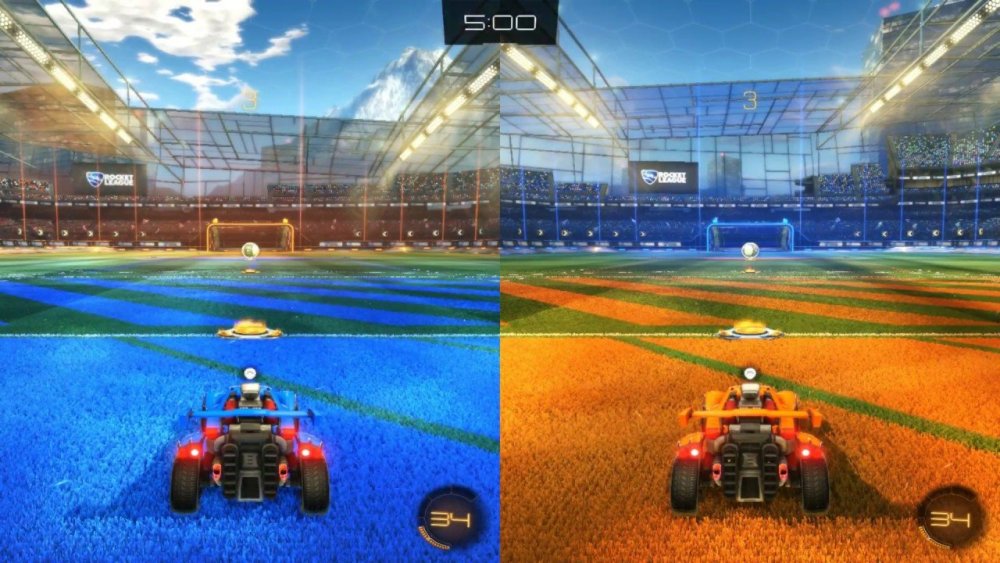
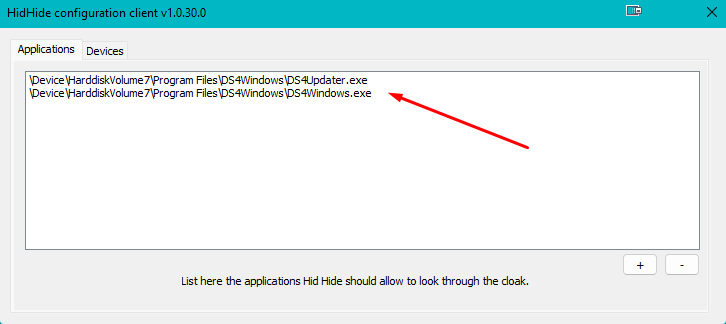
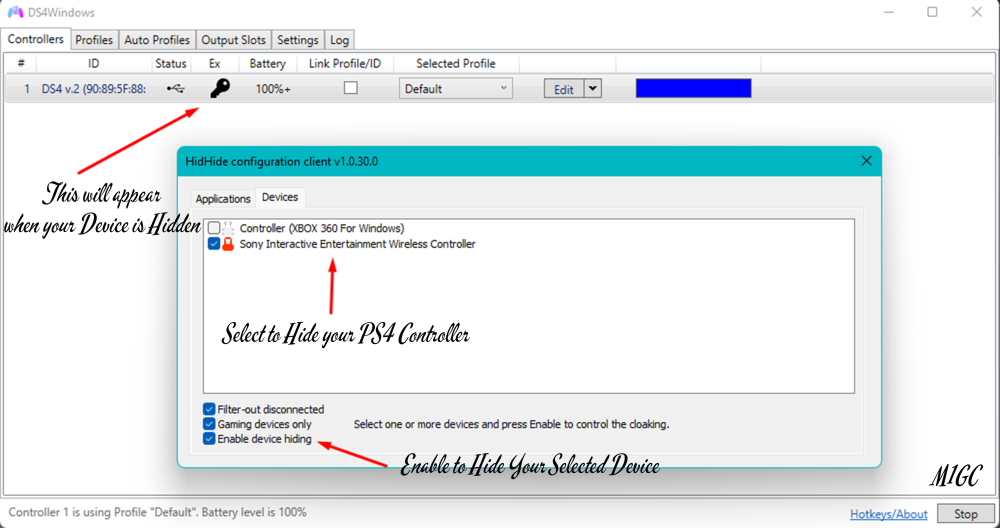
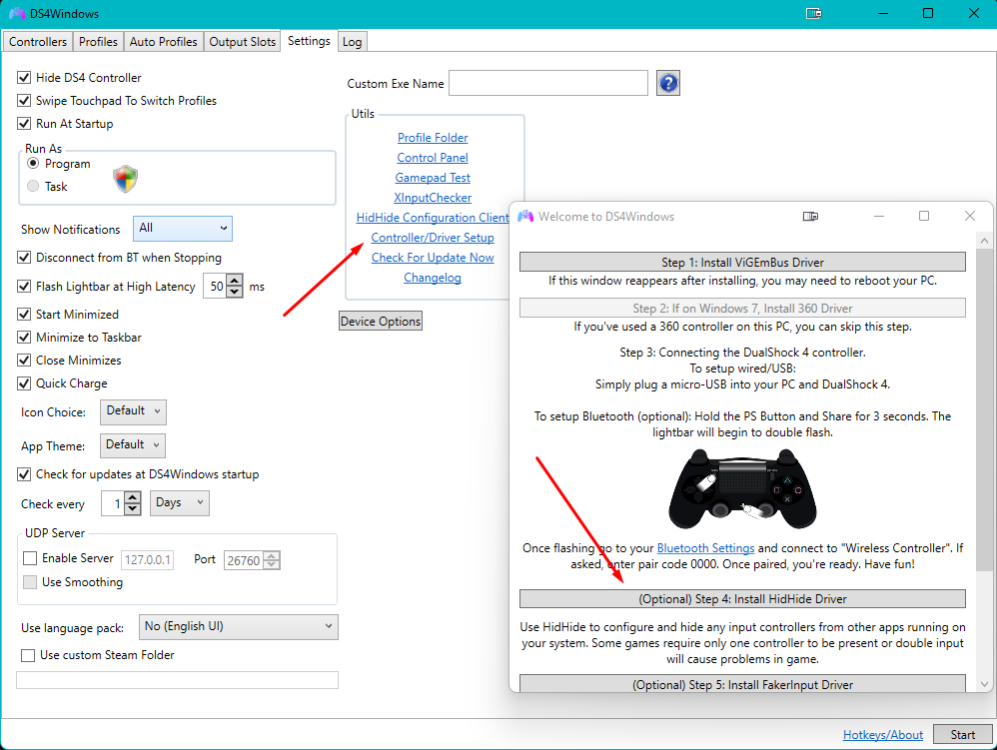
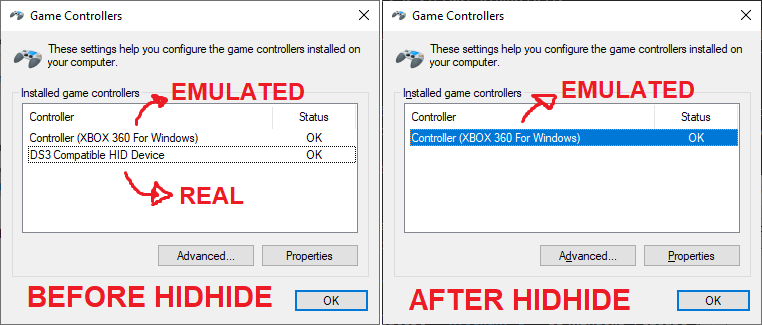
(DS4Windows), creates a virtual controller (Xbox360) & our original controller (PS4 / wireless controller / etc) sends the input to the virtual one which the games can recognize as a controller than can be used. The problem on certain games, usually co-op, split screen games, where more than 1 player is allowed to play on the same system, connecting a controller will show/display x2 controllers for 1 player. When using a controller with DS4Windows, it's highly recommended that the REAL controller is hidden from everything on the system besides DS4Windows itself, in order for only DS4Windows' VIRTUAL controller to remain visible to games. This is necessary to prevent the Double Input Issue. To fix the double input issue, ds4windows has a prebuilt in program called hidhide, which when you setup ds4windows, you may have installed it, If you haven't, You can install it, by clicking Setting's in DS4Windows, Followed by clicking Controller/Driver Setup to install HidHide. With HidHide it is possible to deny a specific application access to one or more human interface devices, effectively hiding a device from the application. In layman's HidHide, allows you hide your original controller (PS4/DS4), and only displays the virtual one (Xbox360/Dualshock4). In DS4Windows, Open HidHide Configuration Client in DS4Windows NOTE: If HidHide link does not open via DS4Windows, Try using alternative methods below. Method: 1 Open HidHide via Windows Search: Type: HidHide Configuration Client Method 2: Manually visiting HidHide installation folder. Default HidHide installation folder: C:\Program Files\Nefarius Software Solutions e.U Open the HidHideClient.exe to open the HidHideClient Configuration Client. HidHide Configuration Client Lets add DS4Windows application, to allow HidHide to use the Cloak. Optional: Adding of the DS4Windows Updaters is not needed. NEXT, let's hide our PS4 Controller and only allow our virtual one. We added the Sony PS4 controller to hidhide, Now in game, The virtual controller will only display. DS4Controller / Wireless Controller / Etc is no longer being shown. This will eliminate any issues with double controller and double input issues. Hope this helps out..... M1
-
- 1
-

-
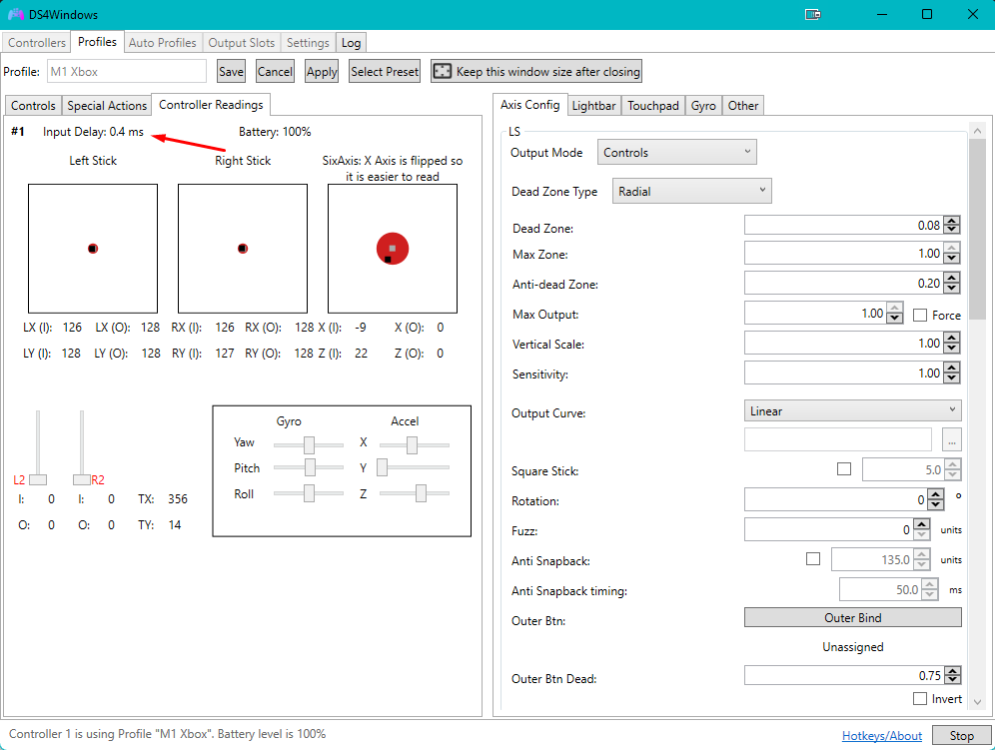
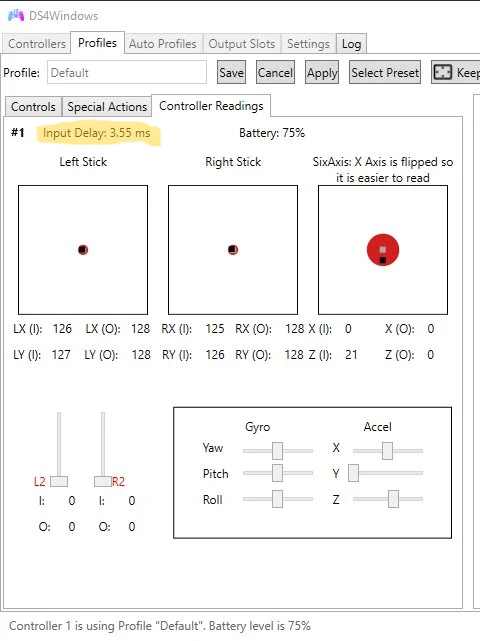
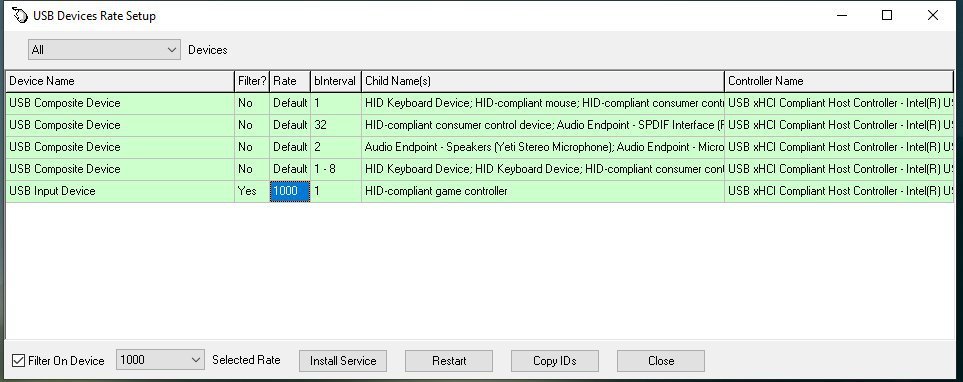
This reduced my input lag from 3.5 to 0.4 in DS4Windows To begin, were going to overclock our controller. You can overclock your controller using hidusbf Download hidusbf from github Extract the hidusbf folder contents to a folder on your computer. (Ignore / Do not extract hidusbfn) inside the driver folder run the setup.exe to open USB Devices Rate Setup. Select All or USB up top left to find your usb controller. Find your controller in the list, Select it / Highlight it, Then install service, Then Check Filter on Device, Next change to 1000, and Click Restart or Disconnect the controller. Replug the controller to complete. Close USB Devices Rate Setup. That's it, Check your latency on DS4Windows
-
- 1
-

-
Like those other DS4 tools, but sexier. DS4Windows is an extract anywhere program that allows you to get the best DualShock 4 experience on your PC. By emulating an Xbox 360 controller, many more games are accessible. Other input controllers are also supported including the DualSense, Switch Pro, and JoyCon controllers (first party hardware only). This project is a fork of the work of Jays2Kings which Jays2Kings seem's has been abandoned. You can find the old project website at ds4windows.com if it is still available. Downloads Main builds of DS4Windows The .7zip package is smaller but requires the 7zip software in order to open/extract it Extract the package in a easily accessible folder (e.g.: Desktop, Documents, Download etc) DO NOT extract it inside a folder the requires elevated privileges (e.g.: Program Files, Windows) Execute the DS4Windows.exe file to run DS4Windows On first launch DS4Windows may ask you where to save its user data (settings and profiles): AppData folder (recommended): user data is stored outside of the program folder, inside a special folder reserved to your Windows user Program folder: user data is stored inside the same folder DS4Windows.exe is located. Requirements Windows 10 or newer (Thanks Microsoft) Microsoft .NET 5.0 or higher Visual C++ 2015-2019 Redistributable. x64 or x86 ViGEmBus driver (DS4Windows will install it for you) Microsoft 360 Driver (link inside DS4Windows, already installed by Windows if you've used a 360 controller before) Sony DualShock 4 or other supported controller Connection method: Micro USB cable Sony Wireless Adapter Bluetooth 4.0 (via an adapter like this or built in pc). Only use of Microsoft BT stack is supported. CSR BT stack is confirmed to not work with the DS4 even though some CSR adapters work fine using Microsoft BT stack. Toshiba's adapters currently do not work. Disabling 'Enable output data' in the controller profile settings might help with latency issues, but will disable lightbar and rumble support. Disable PlayStation Configuration Support and Xbox Configuration Support options in Steam
-
- 1
-

-
You heard that right, no more speculation or rumors required, we have reached the next evolution for PUBG: BATTLEGROUNDS as we transition to a free to play model. We dropped the bomb at The Game Awards and if you weren’t tuned in, you can take a look at how we delivered this monumental news: http://i3.ytimg.com/vi/ak2S07fFhdk/maxresdefault.jpg For Our Seasoned Survivors Switching to F2P will come with a lot of changes and a lot of rewards. If you’re a longtime PUBG player we want to take good care of you as a way of thanking you for your dedication and support. All players who have owned and played PUBG: BATTLEGROUNDS before the free-to-play service transition will automatically receive the PUBG – SPECIAL COMMEMORATIVE PACK, which includes a free BATTLEGROUNDS Plus upgrade and additional in-game rewards. PUBG – SPECIAL COMMEMORATIVE PACK BATTLEGROUNDS Plus Costume skin set Battle-hardened Legacy Corset Battle-hardened Legacy Jacket Battle-hardened Legacy Gloves Battle-hardened Legacy Pants Battle-hardened Legacy Boots Shackle and Shanks Legacy – Pan Nameplate – Battle-hardened Legacy Rewards Distribution BATTLEGROUNDS Plus: Automatically distributed to your account on your first login after the free-to-play transition. Other rewards will automatically be distributed to your account inventory on your first login after the free-to-play transition. BATTLEGROUNDS PLUS BATTLEGROUNDS Plus is a new product that gives PUBG fans a way to supplement their BATTLEGROUNDS experience while supporting the game. Plus is a one-time purchase and includes all of the following: BATTLEGROUNDS Plus upgrade product/DLC will be sold for $12.99 USD after the free-to-play transition. BATTLEGROUNDS Plus unlocks access to the following: Survival Mastery XP +100% boost Career – Medal tab Ranked Mode Creating custom matches. BATTLEGROUNDS Plus includes the following items: Captain’s Camo Hat Captain’s Camo Mask Captain’s Camo Gloves Bonus 1300 G-COIN FREE TO PLAY SERVICE TRANSITION It wouldn’t have been possible for us to come all this way without all our Survivors who have supported our game over the years. To show how much we appreciate the support, all players who have owned and played PUBG: BATTLEGROUNDS before the free-to-play service transition will automatically receive the PUBG – SPECIAL COMMEMORATIVE PACK, which includes a free BATTLEGROUNDS Plus upgrade and various rewards. These will automatically apply to your account after the free-to-play service conversion. The conditions for obtaining rewards and the method of receiving them may differ for each platform, so please check out the details below. Acquiring Rewards Steam: Players who purchased or acquired the game through a redeem code before the free-to-play transition on PST: January 10, 2022 10 AM CET: January 10, 2022 7 PM KST: January 11, 2022 3 AM Xbox/Stadia: Players who have created and setup the in-game nickname after purchase of the game before the free-to-play transition on PST: January 10, 2022 10 AM CET: January 10, 2022 7 PM KST: January 11, 2022 3 AM PlayStation®: Players who have already purchased PUBG: BATTLEGROUNDS can purchase the PUBG – SPECIAL FREE TO PLAY TRANSITION PACK for free on the in-game Store from: PST: December 12, 2021 11 PM – January 10, 2022 11 AM CET: December 13, 2021 8 AM – January 10, 2022 8 PM KST: December 13, 2021 4 PM – January 11, 2022 4 AM ※ For PlayStation® – Japanese accounts, please check the FAQ as different conditions apply. Rewards PUBG – SPECIAL COMMEMORATIVE PACK BATTLEGROUNDS Plus Costume skin set Battle-hardened Legacy Corset Battle-hardened Legacy Jacket Battle-hardened Legacy Gloves Battle-hardened Legacy Pants Battle-hardened Legacy Boots Shackle and Shanks Legacy – Pan Nameplate – Battle-hardened Legacy Rewards Distribution BATTLEGROUNDS Plus: Automatically distributed to your account on your first login after the free-to-play transition. Other rewards will automatically be distributed to your account inventory on your first login after the free-to-play transition. Items can be found under the Customize – Utility tab. The free to play era begins January 12, 2022 and we understand there will be a lot of new Survivors on the Battlegrounds. Whether you’re a seasoned player or fresh on the PUBG scene, you’ll want to head over to our official free to play site which will help you pre-register and claim some sweet freebies. The site also has resources for new players to find their play style to help win that first Chicken Dinner. Free-to-play Service Transition: After the live server maintenance on January 12, 2022. Server Maintenance Schedule PST: January 10, 2022 10 AM – Until maintenance end on January 12, 2022 CET: January 10, 2022 7 PM – Until maintenance end on January 12, 2022 KST: January 11, 2022 3 AM – Until maintenance end on January 12, 2022 Platforms: Steam, Kakao, Xbox, PlayStation®, Stadia PUBG: BATTLEGROUNDS TITLE SALE END PLANS With the free-to-play service transition, PUBG: BATTLEGROUNDS title sale will end on: PST: January 10, 2022 10 AM CET: January 10, 2022 7 PM KST: January 11, 2022 3 AM Purchasing PUBG: BATTLEGROUNDS before the scheduled termination entitles you to acquire BATTLEGROUNDS Plus and the PUBG – SPECIAL COMMEMORATIVE PACK once the transition happens. XBOX/PLAYSTATION® PLAYERS With the free-to-play service transition, subscriptions to Xbox Live or PlayStation® Plus are not required to play PUBG: BATTLEGROUNDS. PUBG: BATTLEGROUNDS service on Xbox Game Pass and PlayStation® Now will be discontinued according to the following schedule. As Xbox Cloud Gaming is a service offered to Xbox Game Pass Ultimate subscribers, PUBG: BATTLEGROUNDS’ Xbox Cloud Gaming service will also end its service. Xbox Game Pass Service End: PST: January 11, 2022 2 AM CET: January 11, 2022 11 AM KST: January 11, 2022 7 PM PlayStation® Now Service End: PST: January 11, 2022 at 10 AM CET: January 11, 2022 at 7 PM KST: January 12, 2022 at 3 AM EVENTS In addition to the various benefits introduced above, we have prepared several events to commemorate the free-to-play service transition of PUBG: BATTLEGROUNDS. Check out the event announcement for more information. FAQ WHAT ARE YOU GOING TO DO ABOUT CHEATING AND HACKING? There are some differences between Basic and BATTLEGROUNDS Plus in accessible game modes. This is partly aimed at giving additional benefits to those upgrading to the BATTLEGROUNDS Plus, but the ultimate reason for restricting the use of some major content is to prevent cheaters. In the case of Ranked Mode, fair play is required the most as it is a fierce competition of players competing over Rank Points(RP). If anyone can play in a Ranked match without any restrictions, there are concerns about the possibility of an increase in potential cheaters as well as the possibility of banned players returning to the game easily. In addition, in order to prevent actions such as promoting unauthorized programs through creating custom matches, some contents are only available through BATTLEGROUNDS Plus. Anti-cheat is more important than ever as PUBG: BATTLEGROUNDS is now free-to-play. We have prepared a separate detailed announcement regarding anti-cheat, so please read more for details. ARE YOU GOING TO REWARD EXISTING PLAYERS? Sure! PUBG: BATTLEGROUNDS wouldn’t have been possible without you all. Rewards PUBG – SPECIAL COMMEMORATIVE PACK BATTLEGROUNDS Plus Costume skin set Battle-hardened Legacy Corset Battle-hardened Legacy Jacket Battle-hardened Legacy Gloves Battle-hardened Legacy Pants Battle-hardened Legacy Boots Shackle and Shanks Legacy – Pan Nameplate – Battle-hardened Legacy Rewards Distribution BATTLEGROUNDS Plus: Automatically distributed to your account on your first login after the free-to-play transition. Other rewards will automatically be distributed to your account inventory on your first login after the free-to-play transition. ARE ANY NEW GAME CONTENT BEING RELEASED ALONGSIDE FREE-TO-PLAY? We have a few surprises in store for later! Check out the details on our future Patch Notes. WHAT’S NEXT FOR THE GAME? Right now, all of our team’s focus is on the free-to-play service transition. However, we will continue introducing game content that many players will find exciting and fun, as we have always done. For example, the codename “Kiki” unfortunately has been postponed to around mid-2022. In addition, as introduced in the Update 14.2 Patch Notes, the next Survivor Pass will be available to you around March 2022. For more details, watch out for future announcements. So please look forward to more to come! I WANT TO GET A REFUND FOR THE TITLE I PURCHASED. WHAT SHOULD I DO? Refunds of BATTLEGROUNDS Plus or PUBG: BATTLEGROUNDS are made based on the consumer protection law of each region and policies of each platform, so please reach out to each platform company for more detailed inquiries. PLAYSTATION® – JAPAN ACCOUNT PLAYERS HAVE DIFFERENT CONDITIONS TO ACQUIRE THE “PUBG – SPECIAL COMMEMORATIVE PACK.” WHAT ARE THE REQUIREMENTS? For PlayStation® – Japan accounts, we are unable to provide free products of a specific value due to local laws and platform policies. Therefore, please purchase the “PUBG – SPECIAL COMMEMORATIVE PACK” for ¥100 from the PlayStation® Store to obtain the reward. See you on the battlegrounds. PUBG: BATTLEGROUNDS Team.
-
UPDATE HAS BEEN COMPLETED!
-
-
M1GC Ground branch dedicated server is a 16 player 24/7 terrorist hunt server. Feel free to lookup our server in the server list as were one of the top ground branch servers.
-
Due to a misconfiguration, our site emails were being bounced. We have since resolved this issue but, Due to this issue, all m1gc emails may hit the spam folder of your email providers inboxes.. Please check your spam folders for any registration emails, and mark our emails as non spam.
-
Share your gamertags in a reply to this post with other members of the website to link up! Whether it is Blizzard Account, or Your Call of Duty Gamertag... Be sure to also share whether your a PC or Console Player.
-
CALL OF DUTY WARZONE LOUNGE
-
Talk all you want about call of duty mw / warzone
-
Any new member who register, for security purposes, you must use your registration email to be allowed on log into the site..
-
M1GC scheduled maintenance has been completed!
-
M1GC is scheduled for maintenance for a site upgrade today.. Site may be unavailable during this maintenance.
-
M1GC scheduled maintenance has been completed!
-
M1GC is scheduled for maintenance for a site upgrade today.. Site may be unavailable during this maintenance.
-
M1GC scheduled maintenance has been completed!
-
M1GC is scheduled for maintenance today.. Site may be unavailable during this maintenance.
-
STUNNEL ERRORS [ ] No certificate or private key specified [!] error queue: ../crypto/x509/by_file.c:199: error:0B084002:x509 certificate routines:X509_load_cert_crl_file:system lib [!] error queue: ../crypto/bio/bss_file.c:76: error:2006D080:BIO routines:BIO_new_file:no such file Stunnel will require a ssl certificate to connect encrypted. I noticed, the actual error is indicating you do not have a SSL CERTIFICATE. I marked your reply, with all Green for working config in your logs, and Red to indicate what is causing stunnel not to start. The fb.conf config is pointing to a ssl cert, but it doesn't seem to exist in the directory according to the error. This ssl certificate may have been left out of the tutorial process, assuming the config was already in this directory during install. I have updated the tutorial and added the instructions on how to add the ssl cert to rid these errors. Instructions will contain information on how to create your own using letsencrypt, openssl, and Mozilla CA Authority Certificate Store, Choose one you wish to use, and add it to the config. I Tested all 3, all are working without any errors... Adding a certificate file, authority, and it's cert locations to the fb.conf should remedy the certificate error. Click this link to return to the tutorial which will have updates on how to create a ssl certificate for stunnel. Then retry to Start the Stunnel Server. Keep me posted / Reply to this thread if you remedy the errors, or if you experience any additional errors.
- 1 reply
-
- 1
-

-
Due to some congestion, we changed up the ip of the arma 3 server and moved it to a different lan with less congestion... New ip should already be listed listed the previous post stats page..
-
Supported Operating Systems Windows Running a Ground Branch dedicated server is only officially supported on Windows at this time. Linux We plan to support running a dedicated server on a Linux some time in the future. We need to sort out potential issues with various plugins we currently use. Linux via Proton / Lutris While it has been confirmed that the game will run under Proton, we have no idea about the server. Mac There are no plans to support running a dedicated server on a Mac. Ports Make sure that your Windows firewall and router are configured to open the following ports: 7777 UDP 27015 UDP Stand alone Dedicated Server A stand alone version of the dedicated server can be obtained using SteamCMD and the appid 476400. For information on downloading and installing SteamCMD, please visit the official page: SteamCMD - Valve Developer Community The command used to download the server is as follows: steamcmd +force_install_dir <InstallDirectory> +login anonymous +app_update 476400 +exit Note: You will need to replace <InstallDirectory> with the directory of your choosing. For instance, to install the dedicated server to c:\gbserver: steamcmd +force_install_dir c:\gbserver +login anonymous +app_update 476400 +exit Starting a server Batch File The easiest way to start the server is to use the included batch file: <Steam Library Location>\steamapps\common\Ground Branch\DedicatedServer.bat For example: C:\Program Files (x86)\Steam\steamapps\common\Ground Branch\DedicatedServer.bat It will automatically find the correct server binary and automatically restart the server if required. Command Line To manually run a server, use the command line: GroundBranchServer-Win64-Shipping.exe <optional map & mission>?<option>?<option> <setting> <switch> The recommended command line is : GroundBranchServer-Win64-Shipping.exe ?MaxPlayers=8?MaxAI=30 MultiHome=X.X.X.X Port=XXXX QueryPort=XXXX -log By adding the MaxPlayer & MaxAI values directly to the command line, it ensures they are set globally, regardless of admin command, voting or game settings. This binary is located in: <Steam Library Location>\steamapps\common\Ground Branch\Binaries\Win64\ Startup Flow Commands Description Maplist If a maplist is present, the server will automatically begin using it upon startup. <MapName>?Mission=<Mission Name> If no maplist is present, any map and mission combination specified in the command line will be used. Note: If either option is missing from the command line, Server Default will be used instead (see below). For example: SmallTown?Mission=IntelRetrieval Server Default If both the above fail, the server will use a map name Server Default, which displays a message to all prompting the admin to create a valid map list. Command Line Options Command line options can be added after the map name. Options must be prefaced with ? and the value must be set using =. For example: GroundBranchServer-Win64-Shipping.exe SmallTown?Mission=IntelRetrieval?MaxPlayers=8 -log Commands Description Mission Required when specifying a map via the command line or in a maplist entry. Tells the game which mission to use. Missions contain information about which game mode script to run as well as any associated actors. Available missions vary from map to map, but by default may include: Deathmatch, IntelRetrieval, TeamElimination, TerroristHunt, Uplink. To manually see which missions are available for what map, look in the following directory: GroundBranch\Content\GroundBranch\Mission MaxPlayers Maximum amount of players this server should allow (8-16) Currently, there is hard limit of 16 for dedicated servers. We recommended a maxium of 8 for coop and 16 for PvP. MaxAI Absolute limit of any AI used in any game mode (0-50). Note: Setting this to 0 would essentially prevent cooperate game modes from working. TimeOfDay Time of day in military time. 0000-2400 TimeLimit After how many minutes until the game ends and the map changes (0+ min) ReadyCountdownTime Delay between declaring ready and everyone being sent to the play area in seconds (5+) PreRoundWaitTime How long keep people frozen before the round begins in seconds (5+) RoundTime How long each round should last in minutes (3+) PostRoundWaitTime End of round delay before everyone is sent back to the ready room in seconds (5+) OpForCount How many AI to spawn in the Intel Retrieval or Terrorist Hunt (1-MaxAI) Difficulty What settings to use for any AI in Intel Retrieval or Terrorist Hunt (1-4, 0 for custom) SpectateFreeCam Can spectators to fly around freely without following anyone? (0/1) SpectateEnemies Can spectators follow members of the enemy teams? (0/1) SpectateForceFirstPerson Should spectators be restricted to first person only view mode? (0/1) Command Line Settings/Switches These are optional arguments that can be used to control various aspects of the engine. The are not case sensitive, but their spelling is important. Settings are key=value pairs. Switches use - prefix. For example: GroundBranchServer-Win64-Shipping.exe TE-PowerStation?RoundTime=10 MultiHome=192.168.1.254 Port=7779 QueryPort=27017 -log Commands Description MultiHome=<ip address> Tells the engine to use a specific IP address for networking. This is only useful if server supports multiple IP's. Port=<number> Tells the engine to use a specific port number. This is only useful if running multiple dedicated server instances on one IP. QueryPort=<number> Tells the engine to use a specific query port number. This is only useful if running multiple dedicated server instances on one IP. -Log Opens console/log contents in new window. Log=<filename.log> Same as -Log, but saves contents to file specified by "filename.log". Map Names 747 Arena Arena2 City Creek Depot Depot_Compound Paintball PowerStation RunDown SmallTown StorageFacility Tanker Automatic Setup If no admins are specified, a file called AdminSetupPassword.txt will be generated the first time the server is started. This file holds a unique password that allows you to become an admin remotely and will displayed in the console window until used. To use, you must connect to the server and type the command admin setup <password> into the console. For example: admin setup 1234asdf Once used, you will be added as a "SuperAdmin" on the server and be presented with the admin menu. Admin Menu The admin menu can be accessed in multiple ways: clicking on the admin button from the escape menu. pressing F8. typing admin into the console. Depending on the level of access, you will have sections for: administrative commands, such as changemap, ban, kick etc. creating or editing maplists. changing server name, message of the day, max players and password. adding or removing admins. Watch a breakdown of "ZooKeeper" admin tool on Youtube (~4min clip) Manual Setup All the .ini files used for configuring the server are located under GroundBranch\ServerConfig. For example: C:\Program Files (x86)\Steam\steamapps\common\Ground Branch\GroundBranch\ServerConfig\Server.ini If no .ini files exist, they will be generated automatically the first time the server is started. Settings are key=value pairs. For example: ServerPassword=password Commenting is done using a semicolon. For example: ; This is a comment. Server.ini --- | --- ServerName | Name of the server (64 characters max) ServerMOTD | The message of the day (512 characters max) <br> = line break. <b> = bold line. <h1 - 3> = heading 1, 2, 3 etc ServerPassword | Password required to join the server. MaxPlayers | Maximum number of players allowed on this server (if not already set by command line) MOTD Example: <h1>Awesome Heading! <br>Another line! <br><b>Some bold text! Admin.ini Contains a list of admin groups and the admins themselves. The admin groups are used to help separate admins into different tiers. For example: An admin that is part of the "SuperAdmin" group can do everything. An admin that is part of the "Moderator" group can only kick, ban or change the map. To add an admin, you need to add a new line based on the following: Admins=(Name="<name>",UniqueId="<SteamId>",ContactInfo="<optional>",Group="<admin group>") For example: Admins=(Name="JoeBlow",UniqueId="12345678901234567",ContactInfo="",Group="SuperAdmin") Note: The :0 (colon zero) that was mentioned in the previous versions of this guide is no longer required. Vote.ini Command Description VoteDuration Hold long a vote will last for. VoteSucceededTimeout How long (in seconds) to wait after a vote has passed before allowing another vote. VoteFailedTimeout How long (in seconds) to wait after a vote has failed before allowing another vote. MinPlayers The minimum number of players required to cast a vote. VotingCommands The commands that can be voted for. For example: VotingCommands=changemap VotingCommands=nextmap VotingCommands=kick MapList.ini Via Admin menu By far the easiest way to creating a map list is via the admin menu. Using the menu you can select a map, configure it's settings and click "add" so that it now appears on the right-slide list. You can repeat this process to add several configured maps/modes into the game roster to play one after another (in the order you add them to the list). Basically this menu is how you generate the MapList.ini (you're seeing in the second half of the screenshot) so it doesn't need to be made manually. However, if you want to manually make the MapList.ini then use the following section as a guide. Manually To create a maplist.ini file manually, create a text file called MapList.ini under /GroundBranch/ServerConfig. Add a section called [/script/rbzookeeper.zkmaplist]. Under this section, add a MapList= entry for each map that you wish to include. Each entry should begin with a map and mission option, followed by any additional options you may wish for that particular map. Note: Any command line option will work here. Coop/PvE example: [/script/rbzookeeper.zkmaplist] MapList=/Game/GroundBranch/Maps/747/747?Mission=/Game/GroundBranch/Mission/747/IntelRetrieval?opforcount=30?difficulty=2?roundtime=60?teamexfil=1?timeofday=0800?timelimit=60?readycountdowntime=60 MapList=/Game/GroundBranch/Maps/City/City?Mission=/Game/GroundBranch/Mission/City/IntelRetrieval?opforcount=30?difficulty=2?roundtime=60?teamexfil=1?timeofday=0800?timelimit=60?readycountdowntime=60 MapList=/Game/GroundBranch/Maps/Creek/Creek?Mission=/Game/GroundBranch/Mission/Creek/IntelRetrieval?opforcount=30?difficulty=2?roundtime=60?teamexfil=1?timeofday=0800?timelimit=60?readycountdowntime=60 MapList=/Game/GroundBranch/Maps/Depot/Depot?Mission=/Game/GroundBranch/Mission/Depot/IntelRetrieval?opforcount=30?difficulty=2?roundtime=60?teamexfil=1?timeofday=0800?timelimit=60?readycountdowntime=60 MapList=/Game/GroundBranch/Maps/PowerStation/PowerStation?Mission=/Game/GroundBranch/Mission/PowerStation/IntelRetrieval?opforcount=30?difficulty=2?roundtime=60?teamexfil=1?timeofday=0800?timelimit=60?readycountdowntime=60 MapList=/Game/GroundBranch/Maps/RunDown/RunDown?Mission=/Game/GroundBranch/Mission/RunDown/IntelRetrieval?opforcount=30?difficulty=2?roundtime=60?teamexfil=1?timeofday=0800?timelimit=60?readycountdowntime=60 MapList=/Game/GroundBranch/Maps/Tanker/Tanker?Mission=/Game/GroundBranch/Mission/Tanker/IntelRetrieval?opforcount=30?difficulty=2?roundtime=60?teamexfil=1?timeofday=0800?timelimit=60?readycountdowntime=60 PvP example: [/script/rbzookeeper.zkmaplist] MapList=/Game/GroundBranch/Maps/Arena/Arena?Mission=/Game/GroundBranch/Mission/Arena/TeamElimination?roundtime=10?timeofday=0800?timelimit=60?readycountdowntime=60?spectatefreecam=0?spectateenemies=0?spectateforcefirstperson=1?useteamrestrictions=1 MapList=/Game/GroundBranch/Maps/Arena2/Arena2?Mission=/Game/GroundBranch/Mission/Arena2/TeamElimination?roundtime=10?timeofday=0800?timelimit=60?readycountdowntime=60?spectatefreecam=0?spectateenemies=0?spectateforcefirstperson=1?useteamrestrictions=1 MapList=/Game/GroundBranch/Maps/747/747?Mission=/Game/GroundBranch/Mission/747/Uplink?roundtime=60?defendersetuptime=30?timeofday=0800?timelimit=60?readycountdowntime=60?spectatefreecam=0?spectateenemies=0?spectateforcefirstperson=1?useteamrestrictions=1 MapList=/Game/GroundBranch/Maps/City/City?Mission=/Game/GroundBranch/Mission/City/Uplink?roundtime=60?defendersetuptime=30?timeofday=0800?timelimit=60?readycountdowntime=60?spectatefreecam=0?spectateenemies=0?spectateforcefirstperson=1?useteamrestrictions=1 MapList=/Game/GroundBranch/Maps/Creek/Creek?Mission=/Game/GroundBranch/Mission/Creek/Uplink?roundtime=60?defendersetuptime=30?timeofday=0800?timelimit=60?readycountdowntime=60?spectatefreecam=0?spectateenemies=0?spectateforcefirstperson=1?useteamrestrictions=1 MapList=/Game/GroundBranch/Maps/PowerStation/PowerStation?Mission=/Game/GroundBranch/Mission/PowerStation/Uplink?roundtime=60?defendersetuptime=30?timeofday=0800?timelimit=60?readycountdowntime=60?spectatefreecam=0?spectateenemies=0?spectateforcefirstperson=1?useteamrestrictions=1 MapList=/Game/GroundBranch/Maps/RunDown/RunDown?Mission=/Game/GroundBranch/Mission/RunDown/Uplink?roundtime=60?defendersetuptime=30?timeofday=0800?timelimit=60?readycountdowntime=60?spectatefreecam=0?spectateenemies=0?spectateforcefirstperson=1?useteamrestrictions=1 MapList=/Game/GroundBranch/Maps/SmallTown/SmallTown?Mission=/Game/GroundBranch/Mission/SmallTown/Uplink?roundtime=60?defendersetuptime=30?timeofday=0800?timelimit=60?readycountdowntime=60?spectatefreecam=0?spectateenemies=0?spectateforcefirstperson=1?useteamrestrictions=1
-
- 1
-

-
Any new member who register, you must click your registration email to be allowed on the site.. If no link is clicked, your registration will be removed and you may have to re-register...
-
Website upgraded to its latest version...


