-
Announcement
Welcome to M1GC
Leaderboard


Popular Content
Showing content with the highest reputation since 09/17/19 in all areas
-
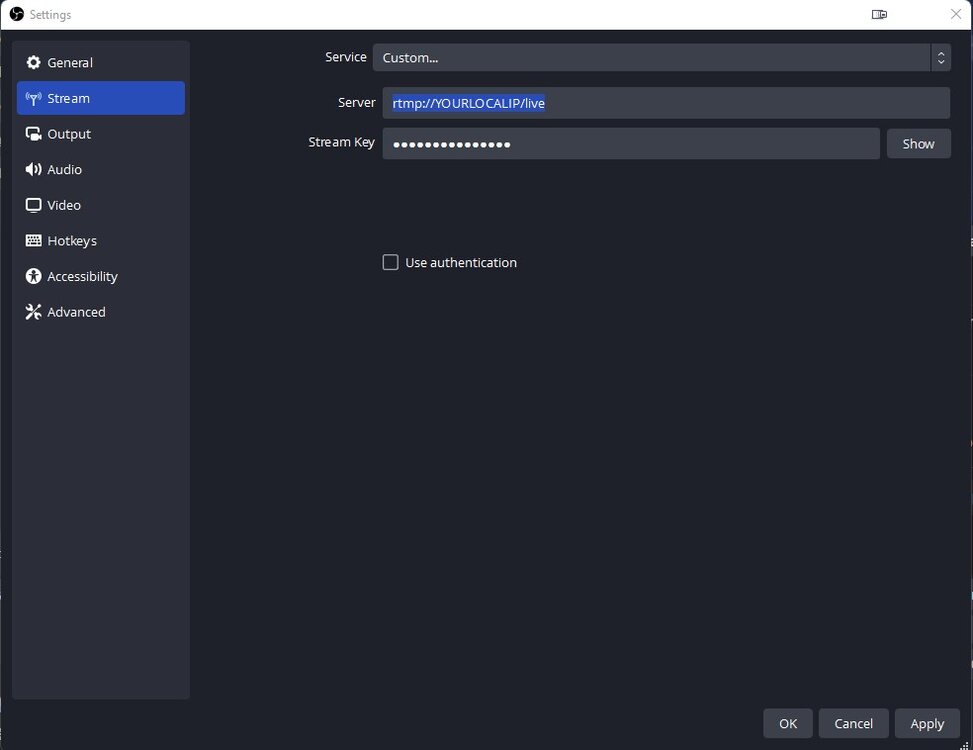
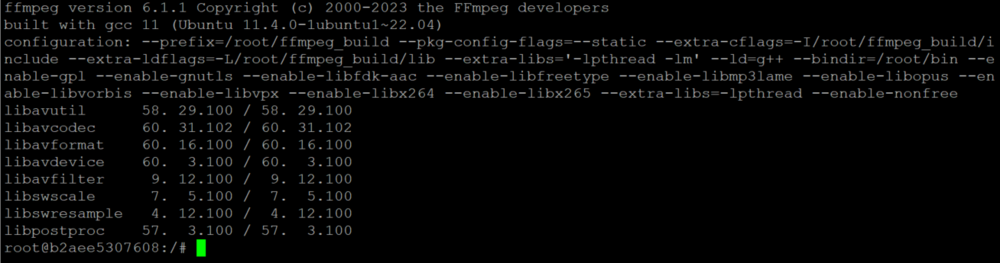
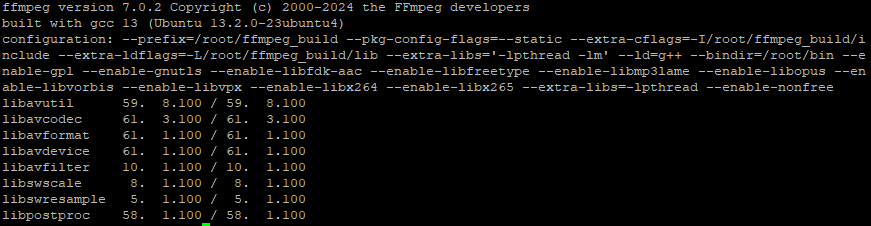
Creating Your own Private NGINX/RTMP/FFMPEG server for streaming NGINX/FFMPEG-based Media Streaming Server Ubuntu Latest LTS x64 Based OS with NGINX LATEST w RTMP SUPPORT / FFMPEG LATEST RTMP/HLS/MPEG-DASH live streaming RTMP Video on demand FLV/MP4, playing from local filesystem or HTTP Stream relay support for distributed streaming: push & pull models Recording streams in multiple FLVs H264/AAC support Online transcoding with FFmpeg HTTP callbacks (publish/play/record/update etc) Running external programs on certain events (exec) HTTP control module for recording audio/video and dropping clients Advanced buffering techniques to keep memory allocations at a minimum level for faster streaming and low memory footprint Proved to work with Wirecast, FMS, Wowza, JWPlayer, FlowPlayer, StrobeMediaPlayback, ffmpeg, avconv, rtmpdump, flvstreamer and many more Statistics in XML/XSL in machine- & human- readable form REQUIREMENTS X2 PC's - One for Broadcasting / One for Streaming for Best Results. If you only have X1 PC - System must have enough resources to support Broadcasting / Streaming, including running virtualization technology and virtual machines. Ubuntu OS (May work on other Operating Systems with command modifications) Multi-core CPU for FFMPEG / 2GB RAM Minimum / 4GB+ or more Recommended Disk space as required for any media files or recordings... PLEASE NOTE: You can also try our Docker Version which may save you some resources and time. The Tutorial below will describe for both x1 or x2 pc / server setups.. Setting up the RTMP Streaming Server on 2nd Streaming PC or VM PLEASE NOTE: IF YOU DO NOT HAVE A 2ND PC FOR STREAMING You can run a 2nd Operating System / system on your main computer you use by utilizing virtualization: VMWare Workstation (Paid) or VirtualBox (Free) or Docker (Free) You may also use Cloud Providers such as Digital Ocean, AWS, Google Cloud, Microsoft Azure to create a machine but may be costly or you can use M1-Serverz VPS which is a bit more affordable. We recommend having enough CPU, Memory, & Bandwidth Resources to achieve stable streaming on the same PC. If you do not know how to install Ubuntu Server to VMWare Workstation, VirtualBox, & Docker, Check the links below: How to install Ubuntu Server to VMWare Workstation Purchase: VMWare Workstation How to install Ubuntu Server to VirtualBox Download: Virtualbox How to Install Ubuntu Server to Docker Desktop Download Docker Desktop NOTE: DOCKER DESKTOP UPDATED THERE SUBSCRIPTION LICENSE THIS MAY AFFECT WINDOWS USERS USING DOCKER DESKTOP. CLICK HERE FOR MORE INFORMATION Download Ubuntu Server OS Latest Once your Virtualization Software is installed, & you have created a VM (Virtual Machine) with the latest Ubuntu Server operating system on your VM, Login to your Ubuntu Server System. Install SSH on your Ubuntu Server apt install ssh openssh-server -y (You can now use Putty to SSH into your VM - Example: yourubuntuusername@yourlocalorexternalip ) User is logged in as root. (Not Recommended) During this example, i am logged in a root. To login as root user: sudo su We recommend using a standard user without administrator permissions for best security. If logged in as root - You do not need to add sudo to every command. If logged in as a user - add sudo to all commands below (Example: sudo apt install ffmpeg ) Installing FFMPEG on Ubuntu Server (Optional) Notice: FFMPEG is back in Ubuntu. Ubuntu Server now comes with FFMPEG by default in its repositories. Therefore, to install it, You only need to run: apt -y install ffmpeg Next, verify the installation with the following terminal command: ffmpeg -version If you wish to compile FFMPEG from source to use the latest version, follow this FFMPEG Compilation Guide. Compiling FFMPEG from Source (Ubuntu 22.04.4 LTS ) These are packages required for compiling, but you can remove them when you are done if you prefer: apt update -qq && apt -y install \ autoconf \ automake \ build-essential \ cmake \ git-core \ libass-dev \ libfreetype6-dev \ libgnutls28-dev \ libmp3lame-dev \ libsdl2-dev \ libtool \ libva-dev \ libvdpau-dev \ libvorbis-dev \ libxcb1-dev \ libxcb-shm0-dev \ libxcb-xfixes0-dev \ meson \ ninja-build \ pkg-config \ texinfo \ wget \ yasm \ zlib1g-dev \ nasm \ libx264-dev \ libx265-dev \ libnuma-dev \ libvpx-dev \ libfdk-aac-dev \ libopus-dev \ libunistring-dev \ libaom-dev \ libdav1d-dev Create a directory for Compilation files / binaries of FFMPEG mkdir -p ~/ffmpeg_sources ~/bin Begin Compiling and Installing FFMPEG cd ~/ffmpeg_sources && \ wget -O ffmpeg-7.1.1.tar.bz2 https://ffmpeg.org/releases/ffmpeg-7.1.1.tar.bz2 && \ tar xjvf ffmpeg-7.1.1.tar.bz2 && \ cd ffmpeg-7.1.1 && \ PATH="$HOME/bin:$PATH" PKG_CONFIG_PATH="$HOME/ffmpeg_build/lib/pkgconfig" ./configure \ --prefix="$HOME/ffmpeg_build" \ --pkg-config-flags="--static" \ --extra-cflags="-I$HOME/ffmpeg_build/include" \ --extra-ldflags="-L$HOME/ffmpeg_build/lib" \ --extra-libs="-lpthread -lm" \ --ld="g++" \ --bindir="$HOME/bin" \ --enable-gpl \ --enable-gnutls \ --enable-libfdk-aac \ --enable-libfreetype \ --enable-libmp3lame \ --enable-libopus \ --enable-libvorbis \ --enable-libvpx \ --enable-libx264 \ --enable-libx265 \ --extra-libs="-lpthread" \ --enable-nonfree && \ PATH="$HOME/bin:$PATH" make && \ make -j4 install && \ hash -r Be patient and grab a coffee as this process may take a few mins to complete. Next, Change to your ffmpeg bin directory cd ~/bin Then, Copy FFMPEG to its default locations on Linux cp ffmpeg /usr/bin/ffmpeg cp ffmpeg /usr/share/ffmpeg cp ffmpeg /usr/local/bin/ffmpeg Optional: Copy FFPLAY to its default locations on Linux FFplay is a very simple and portable media player using the FFmpeg libraries and the SDL library. It is mostly used as a testbed for the various FFmpeg APIs. cp ffplay /usr/bin/ffplay cp ffplay /usr/share/ffplay cp ffplay /usr/local/bin/ffplay Optional: Copy FFPROBE to it's default location on Linux. ffprobe gathers information from multimedia streams and prints it in human- and machine-readable fashion. For example it can be used to check the format of the container used by a multimedia stream and the format and type of each media stream contained in it. cp ffprobe /usr/bin/ffprobe cp ffprobe /usr/share/ffprobe cp ffprobe /usr/local/bin/ffprobe Next, verify the installation with the following terminal command: ffmpeg -version FFMPEG IS NOW COMPILED AND READY FOR USE Lets cleanup and remove its install directories & binaries Change directory to ~ cd ~ Next, lets remove the FFMPEG Compilation Directories. rm -r bin ffmpeg_build ffmpeg_sources Then exit out of the home directory and to the root directory cd .. or cd / Compiling and installing NGINX with the RTMP module You need to install the prerequisite libraries Install the Prerequisite Libraries apt install unzip zlib1g-dev wget vim-nox nano build-essential libpcre3 libpcre3-dev libssl-dev -y Now you need to download the latest NGINX and the RTMP Module and unpack them Check this link for NGINX latest mainline version. wget https://nginx.org/download/nginx-1.28.0.tar.gz wget https://github.com/MurderousOne/nginx-rtmp-module/archive/master.zip tar -xvf nginx-1.28.0.tar.gz unzip master.zip cd nginx-1.28.0 Build NGINX with the NGINX-RTMP Module Configure, Make, Make Install ./configure --with-http_ssl_module --add-module=../nginx-rtmp-module-master --with-debug --with-cc-opt="-Wimplicit-fallthrough=0" && make && make install Configuring NGINX Once Nginx is compiled, The default location for the configuration file is: /usr/local/nginx/conf/nginx.conf Edit the NGINX Configuration File vi /usr/local/nginx/conf/nginx.conf or nano /usr/local/nginx/conf/nginx.conf and at the end of the file, add the following: # ____ _____ __ __ ____ __ __ _____ ____ ___ _ ____ _____ ____ _____ _ __ __ ___ _ _ ____ ____ _____ ______ _______ ____ # | _ \_ _| \/ | _ \ | \/ | ____| _ \_ _| / \ / ___|_ _| _ \| ____| / \ | \/ |_ _| \ | |/ ___| / ___|| ____| _ \ \ / / ____| _ \ # | |_) || | | |\/| | |_) | | |\/| | _| | | | | | / _ \ \___ \ | | | |_) | _| / _ \ | |\/| || || \| | | _ \___ \| _| | |_) \ \ / /| _| | |_) | # | _ < | | | | | | __/ | | | | |___| |_| | | / ___ \ ___) || | | _ <| |___ / ___ \| | | || || |\ | |_| | ___) | |___| _ < \ V / | |___| _ < # |_| \_\|_| |_| |_|_| |_| |_|_____|____/___/_/ \_\ |____/ |_| |_| \_\_____/_/ \_\_| |_|___|_| \_|\____| |____/|_____|_| \_\ \_/ |_____|_| \_\ # rtmp { server { listen 1935; ping 30s; notify_method get; application live { live on; #push to restream.io push rtmp://live.restream.io/live/streamkey; } } } That's it. Above the live application will publish a stream direct from your streaming software to any platform you listed as push. in this case, it is sending a stream from my PC with OBS Studio, to the 2nc PC Streaming Server, which then sends the stream out to the platform listed. Want to send more? Just add another push and send your stream to that platform as well. # ____ _____ __ __ ____ __ __ _____ ____ ___ _ ____ _____ ____ _____ _ __ __ ___ _ _ ____ ____ _____ ______ _______ ____ # | _ \_ _| \/ | _ \ | \/ | ____| _ \_ _| / \ / ___|_ _| _ \| ____| / \ | \/ |_ _| \ | |/ ___| / ___|| ____| _ \ \ / / ____| _ \ # | |_) || | | |\/| | |_) | | |\/| | _| | | | | | / _ \ \___ \ | | | |_) | _| / _ \ | |\/| || || \| | | _ \___ \| _| | |_) \ \ / /| _| | |_) | # | _ < | | | | | | __/ | | | | |___| |_| | | / ___ \ ___) || | | _ <| |___ / ___ \| | | || || |\ | |_| | ___) | |___| _ < \ V / | |___| _ < # |_| \_\|_| |_| |_|_| |_| |_|_____|____/___/_/ \_\ |____/ |_| |_| \_\_____/_/ \_\_| |_|___|_| \_|\____| |____/|_____|_| \_\ \_/ |_____|_| \_\ # rtmp { server { listen 1935; ping 30s; notify_method get; application live { live on; #push to restream.io push rtmp://live.restream.io/live/streamkey; #push to youtube push rtmp://a.rtmp.youtube.com/live2/streamkey; } } } PLEASE NOTE: You will require the same amount of bandwidth for both push streams. If you use 6mbps to stream a 1080p60fps stream to one platform, it will require 12mbps of Upload Bandwidth for streaming to x2 platforms. Using restream.io will save you on streaming to multi-platforms simultaneously. You can stream to 30+ platforms and only use 6mbps.. Adding additional push to platforms, will require additional upload bandwidth... Be sure to speed test your upload speeds to test your networks full capabilities. Running the server You can start the nginx server manually by running the following command: /usr/local/nginx/sbin/nginx But we recommend you add it in your services for convenience. wget https://raw.githubusercontent.com/MurderousOne/nginx-rtmp-ffmpeg-docker/main/nginx -O /etc/init.d/nginx chmod +x /etc/init.d/nginx update-rc.d -f nginx defaults Start / Stop / Restart the NGINX server service nginx start service nginx stop service nginx restart Back out of NGINX FOLDER cd .. Download the above commands as shell scripts for easy executing. wget https://raw.githubusercontent.com/MurderousOne/nginx-rtmp-ffmpeg-docker/main/upgrade wget https://raw.githubusercontent.com/MurderousOne/nginx-rtmp-ffmpeg-docker/main/edit-rtmp wget https://raw.githubusercontent.com/MurderousOne/nginx-rtmp-ffmpeg-docker/main/start-rtmp wget https://raw.githubusercontent.com/MurderousOne/nginx-rtmp-ffmpeg-docker/main/stop-rtmp wget https://raw.githubusercontent.com/MurderousOne/nginx-rtmp-ffmpeg-docker/main/restart-rtmp Make the scripts executable chmod +x upgrade edit-rtmp restart-rtmp start-rtmp stop-rtmp Cleaning up left over files and folders These installation files are no longer needed and will reduce space on your server rm -r master.zip nginx-1.28.0 nginx-rtmp-module-master nginx-1.28.0.tar.gz SET ULIMIT (For Docker Containers Only) ulimit -n 1024 This allows for nginx exec commands to run without issues if installing on docker containerized environments. Execute the shell commands Start / Stop / Restart the NGINX server Start the NGINX Server ./start-rtmp Stop the server ./stop-rtmp Restart the server ./restart-rtmp Edit the rtmp server config ./edit-rtmp Upgrade the software packages ./upgrade Setting up the main broadcasting / streaming computer Main broadcasting computer or Any ol PC Capable of running OBS Studio with x264 or NVENC encoding. In OBS, i use NVENC encoding and I use my monitor’s native resolution (1080p). Using OBS Studio, in your broadcast settings you need to use the “Custom” streaming service. NOTE: (You can use your servers local IP or External IP Address) Your Stream Key needs to be the same you used in your nginx configuration. (Stream-Key is Case-Sensitive) In the Encoding, use Nvidia NVENC (Since it doesn’t use a lot of CPU). Bitrates Click here for Live encoder settings, bitrates, and resolutions You may need to reduce your bitrate depending on services bandwidth limits. You may need to adjust your max bitrate according to your needs and capabilities Audio As for Audio encoding, I use the AAC codec, 96k bit rate and a Format of 44 or 48Khz. That's it You can now stream direct with your own lightweight private rtmp server, just like a restream.io, using your own bandwidth, but without the platform limit's.
 3 points
 -
Publishing with FFMPEG The easiest way to publish live video streams is by using ffmpeg (or avconv). It's already installed on most systems and easy to install on others. RTMP supports only a limited number of codecs. The most popular RTMP video codecs are H264, Sorenson-H263 (aka flv) and audio codecs AAC, MP3, Nellymoser, Speex. If your video is encoded with these codecs (the most common pair is H264/AAC) then you do not need any conversion. Otherwise you need to convert video to one of supported codecs. We'll stream test file /var/videos/test.mp4 to server with ffmpeg. Below are some different examples of how to use FFMPEG To Stream Live Video. Streaming without conversion (given test.mp4 codecs are compatible with RTMP) ffmpeg -re -i /var/Videos/test.mp4 -c copy -f flv rtmp://localhost/myapp/mystream Streaming and encoding audio (AAC) and video (H264), need libx264 and libfaac ffmpeg -re -i /var/Videos/test.mp4 -c:v libx264 -c:a libfaac -ar 44100 -ac 1 -f flv rtmp://localhost/myapp/mystream Streaming and encoding audio (MP3) and video (H264), need libx264 and libmp3lame ffmpeg -re -i /var/Videos/test.mp4 -c:v libx264 -c:a libmp3lame -ar 44100 -ac 1 -f flv rtmp://localhost/myapp/mystream Streaming and encoding audio (Nellymoser) and video (Sorenson H263) ffmpeg -re -i /var/Videos/test.mp4 -c:v flv -c:a nellymoser -ar 44100 -ac 1 -f flv rtmp://localhost/myapp/mystream Publishing video from webcam (Linux) ffmpeg -f video4linux2 -i /dev/video0 -c:v libx264 -an -f flv rtmp://localhost/myapp/mystream Publishing video from webcam (MacOS) ffmpeg -f avfoundation -framerate 30 -i "0" -c:v libx264 -an -f flv rtmp://localhost/myapp/mystream Playing with ffplay ffplay rtmp://localhost/myapp/mystream OK NOW LETS MODIFY OUR CONFIG TO USE FFMPEG TO CONVERT OUR STREAM AND PUBLISH TO OUR PLATFORMS. Publishing a live stream to Restream.io & Facebook.com using FFMPEG This config is an example of how we will publish to multi-platforms using FFMPEG... rtmp { server { listen 1935; chunk_size 4096; application myapp { live on; #FFMPEG COPYING AND SENDING THE STREAM TO LIVEOUT exec ffmpeg -re -i "rtmp://127.0.0.1/myapp/YOURSTREAMKEY" -c:v libx264 -crf 0 -c copy -f flv "rtmp://127.0.0.1/liveout/YOURSTREAMKEY"; } application liveout { live on; record off; #LIVE OUT RECEIVING THE STREAM FROM ( myapp ) AND SENDING THE COPY OUT TO RESTREAM AND FACEBOOK #RESTREAM.IO DIRECT push rtmp://live.restream.io/live/YOUR_STREAM_KEY; #FACEBOOK DIRECT push rtmp://live-api-s.facebook.com:80/rtmp/YOUR_STREAM_KEY; } } } Lets explain whats happening in the code above The Live Application (myapp) will import your stream from your streaming software (OBS, XSplit, Wirecast) using ffmpeg. The myapp, will run the stream thru FFMPEG without conversion, using the x264 or x265 encoder, while copying the stream into a .FLV video format file. The .flv file is then sent to the liveout application all in real-time. (liveout), The liveout application (liveout) will receive a copy of your stream, and then pushed / sends your stream to any platform you listed to push too. That's it. ENJOY STREAMING WITH NGINX AND FFMPEG!2 points
-
Unfortunately, The NGINX module nginx-rtmp-module doesn’t support RTMPS “out-of-the-box”. The nginx-rtmp-module also doesn't support pushing to an rtmps:// address... and i don't think the feature will be added in any recent releases as it is simple to achieve this and the module hasn't been updated in years... A easy way to incorporate RTMPS into this module is by using stunnel, a popular “application used to provide a universal TLS/SSL tunneling service”. How to Secure rtmps push / rtmps stream to Facebook I'll assume you have some pre-installed version of Nginx installed with the RTMP-Module & ffmpeg (optional) Using NGINX on Windows For this setup, I’m using nginx 1.17.0.1 Crow (download here) on Windows 10. The subscription version for windows contains the RTMP-Module (Read here to view free / commercial Nginx modules installed) Purchase your subscription here. NOTE: (Purchase at own risk as M1GC are not affiliated with this website) or try to find a nginx for windows version that is available for free. PLEASE NOTE: NGINX AND THE RTMP STREAMING SERVER MODULE MUST BE CONFIGURED FOR WINDOWS STREAMING BEFORE USING STUNNEL Stunnel for Windows (Download) After you installed stunnel, you need to edit stunnel.conf which is located in C:\\Users\YourUsername\AppData\Local\stunnel\config\stunnel.conf Stunnel uses SSL certificates to secure its connections, which you can easily create using the OpenSSL package, Certbot, or by using the Stunnels SSL Cert: On Windows On windows, during stunnels install / start up, you will create a default certificate for your server which can be used to secure your server from man in the middle attacks... Your code will look like so, to use a secure certificate during your live streams. [fb-live] client = yes accept = 127.0.0.1:19350 connect = live-api-s.facebook.com:443 verifyChain = yes CAfile = C:\Program Files (x86)\stunnel\config\ca-certs.pem checkHost = live-api-s.facebook.com OCSPaia = yes This creates a session that allows NGINX to send the stream via RTMP and stunnel will then send the stream to Facebook via RTMPS. ____________ ____________ ____________ ____________ | Streaming | | | | | | Facebook | | Source | ---> | NGINX | ---> | stunnel | ---> | Live | |____________| |____________| |____________| |____________| Now modify nginx.conf and replace the old Facebook push instruction (If you had it there before) with the following line: push rtmp://127.0.0.1:19350/rtmp/<your_facebook_stream_key>; Save those two files and start stunnel via command-line or with the GUI application and then start nginx. Test your live stream with OBS or ffmpeg. That’s all there is to it! On LINUX Install Stunnel4 apt-get install stunnel4 -y Now lets create our default stunnel config This will set stunnel linux userid, processid, and groupid. It will also output any issues to the stunnel.log file, while including a new config directory, for using individual stunnel config files instead of a single config. nano /etc/stunnel/stunnel.conf and copy, paste the code below and save setuid = stunnel4 setgid = stunnel4 pid=/tmp/stunnel.pid output = /var/log/stunnel4/stunnel.log include = /etc/stunnel/conf.d Create LetsEncrypt Signed Certificate Install Certbot Run this command on the command line on the machine to install Certbot. snap install --classic certbot Create a Standalone Certificate Authority Prepare the Certbot command Execute the following instruction on the command line on the machine to ensure that the certbot command can be run. ln -s /snap/bin/certbot /usr/bin/certbot Choose how you'd like to run Certbot (Standalone / Domain or DNS) Creating a Standalone Domain Certificate certbot certonly -d yourdomains.com -d www.yourdomain.com --standalone For DNS / Wildcard Certificate, Click here. DOWNLOAD The Mozilla CA Certificate Store Certificate:: wget https://curl.se/ca/cacert.pem (M1GC's Mozilla CA certificate Store Certificate) (MIRROR) wget https://m1-gamingz.com/stunnel/cacert.pem Make a directory for your certs, just in case you create more configs (recommended) mkdir /etc/stunnel/certs/ COPY the cert to your new Directory cp cacert.pem /etc/stunnel/certs/ca-certs.pem Update the fb.conf (/etc/stunnel/conf.d/fb.conf) to the new certificate location if you choose to save your cert in a new directory. nano /etc/stunnel/conf.d/fb.conf EXAMPLE OF fb.conf with LetsEncrypt Signed Certificate: [fb-live] client = yes accept = 127.0.0.1:19350 connect = live-api-s.facebook.com:443 cert = /etc/letsencrypt/live/YOURDOMAIN/fullchain.pem key = /etc/letsencrypt/live/YOURDOMAIN/privkey.pem verifyChain = yes CAfile = /etc/stunnel/certs/ca-certs.pem checkHost = live-api-s.facebook.com OCSPaia = yes sslVersion = TLSv1.3 options = NO_SSLv2 options = NO_SSLv3 You can use the full chain.pem in your fb.conf which is a combination of your private key (privkey) and your (cert). Basically, the full chain.pem above is a combining of the the two private key, cert, and ca authority into one file name. BELOW ARE MORE EXAMPLES OF USING DIFFERENT CERTIFICATES WITH STUNNEL. Create a Self Signed Certificate for Stunnel (OpenSSL) Stunnel uses SSL certificate to secure its connections, which you can easily create using the OpenSSL package: Using stunnel in client mode (i.e., stunnel is not acting as an SSL server) means you (the client) probably don't need to present a valid certificate (to the server). SINCE WERE CONNECTING REMOTELY IN CLIENT MODE, WE CAN USE THE MOZILLAS CA AUTHORITY STORE CERT AS A CA AUTHORITY. The cacerts file is a collection of trusted certificate authority (CA) certificates. Make a directory for your certs, just in case you create more configs (recommended) mkdir /etc/stunnel/certs/ Now lets create a self signed certificate and a private key openssl genrsa -out key.pem 2048 openssl req -new -x509 -key key.pem -out cert.pem -days 1095 at key.pem cert.pem >> /etc/stunnel/certs/combined-cert.pem The commands above is for creating a Private Key, Creating a x509 Certificate using that Private Key with 1095 days before expiration, and combining the two of them into one files named “cert.pem” to use with Stunnel. Note: When creating the certificate, you will be asked for some information such as organization name, country and state, which you can enter whatever you like but when asked for “Common Name” you must enter the correct host name, dns name, or IP address of your server Copy the certs to your new Directory cp key.pem combined-cert.pem /etc/stunnel/certs/ DOWNLOAD The Mozilla CA certificate store certificate:: wget https://curl.se/ca/cacert.pem (M1GC Mozilla CA certificate store certificate MIRROR) wget https://m1-gamingz.com/stunnel/cacert.pem COPY the cert to your new Directory cp cacerts.pem /etc/stunnel/certs/ca-certs.pem Make sure to update the fb.conf (/etc/stunnel/conf.d/fb.conf) to the new certificate location if you choose to save your cert in a new directory. nano /etc/stunnel/conf.d/fb.conf EXAMPLE OF fb.conf with Self Signed Certificate: [fb-live] client = yes accept = 127.0.0.1:19350 connect = live-api-s.facebook.com:443 cert = /etc/stunnel/certs/combined-cert.pem key = /etc/stunnel/certs/key.pem verifyChain = yes CAfile = /etc/stunnel/certs/ca-certs.pem checkHost = live-api-s.facebook.com OCSPaia = yes sslVersion = TLSv1.3 options = NO_SSLv2 options = NO_SSLv3 USING MOZILLAS CA AUTHORITY CERTIFICATE ONLY IN STUNNEL (STUNNEL CLIENT MODE ONLY) CERTIFICATE AUTHORITY FOR STUNNEL (Mozilla CA Authority Certificate) Stunnel uses SSL certificate to secure its connections, which you can easily create using the certificate provided by Mozilla and CACERT: Using stunnel in client mode (i.e., stunnel is not acting as an SSL server) means you (the client) probably don't need to present a valid certificate (to the server). SINCE WERE CONNECTING REMOTELY IN CLIENT MODE, WE CAN USE THE MOZILLAS CA AUTHORITY STORE CERT AS A CA AUTHORITY. The cacerts file is a collection of trusted certificate authority (CA) certificates. You can also make a directory for your certs, just in case you create more configs (recommended) mkdir /etc/stunnel/certs/ DOWNLOAD The Mozilla CA certificate store certificate: wget https://curl.se/ca/cacert.pem (M1GC Mozilla CA certificate store certificate MIRROR) wget https://m1-gamingz.com/stunnel/cacert.pem COPY the cert to your new Directory cp cacerts.pem /etc/stunnel/certs/ca-certs.pem Make sure to update the fb.conf (/etc/stunnel/conf.d/fb.conf) to the new certificate location if you choose to save your cert in a new directory. nano /etc/stunnel/conf.d/fb.conf EXAMPLE OF fb.conf with Mozilla's CA Certificate: [fb-live] client = yes accept = 127.0.0.1:19350 connect = live-api-s.facebook.com:443 verifyChain = yes CAfile = /etc/stunnel/certs/ca-certs.pem checkHost = live-api-s.facebook.com OCSPaia = yes sslVersion = TLSv1.3 options = NO_SSLv2 options = NO_SSLv3 THATS IT. NOW LETS RUN / START STUNNEL... Start Stunnel systemctl restart stunnel4 && systemctl status stunnel4 or Service stunnel4 restart && service stunnel4 status OUTPUT ● stunnel4.service - LSB: Start or stop stunnel 4.x (TLS tunnel for network daemons) Loaded: loaded (/etc/init.d/stunnel4; generated) Active: active (running) since Thu 2021-07-01 13:54:20 UTC; 29ms ago Docs: man:systemd-sysv-generator(8) Process: 1270 ExecStart=/etc/init.d/stunnel4 start (code=exited, status=0/SUCCESS) Tasks: 2 (limit: 4615) Memory: 7.0M CGroup: /system.slice/stunnel4.service └─1299 /usr/bin/stunnel4 /etc/stunnel/stunnel.conf Jul 01 13:54:20 stunnel stunnel[1295]: LOG5[ui]: Reading configuration from file /etc/stunnel/stunnel.conf Jul 01 13:54:20 stunnel stunnel[1295]: LOG5[ui]: UTF-8 byte order mark not detected Jul 01 13:54:20 stunnel stunnel[1295]: LOG5[ui]: Reading configuration from file /etc/stunnel/conf.d/fb.conf Jul 01 13:54:20 stunnel stunnel[1295]: LOG5[ui]: UTF-8 byte order mark not detected Jul 01 13:54:20 stunnel stunnel[1295]: LOG5[ui]: FIPS mode disabled Jul 01 13:54:20 stunnel stunnel[1295]: LOG5[ui]: Configuration successful Jul 01 13:54:20 stunnel stunnel4[1270]: Starting TLS tunnels: /etc/stunnel/stunnel.conf: started Jul 01 13:54:20 stunnel systemd[1]: Started LSB: Start or stop stunnel 4.x (TLS tunnel for network daemons). STUNNEL IS NOW UP AND RUNNING Assuming FFMPEG is installed, We can run a ffmpeg command to test pushing a stream, target to local stunnel port :19350 ffmpeg -re -i rtmp://127.0.0.1/live/yourstreamkeyinobs -c:v libx264 -c:a aac -f flv rtmp://127.0.0.1:19350/rtmp/<facebook-live-stream-key> If your stream goes live on Facebook, The Stunnel is Now ready to work! Now we just need to Replace the URL to the local stunnel port within the NGINX RTMP config. Change this line in your nginx config (Streaming to Facebook Un-Securely) push rtmp://live-api-s.facebook.com:80/rtmp/<facebook-live-stream-key>; To (Streaming to Facebook Securely) push rtmp://127.0.0.1:19350/rtmp/<facebook-live-stream-key>; All done! Again, From a high level Your Streaming Source (OBS/XSplit/Wirecast/etc) NGINX Stunnel Facebook Your stream should now operate like so: ____________ ____________ ____________ ____________ | Streaming | | | | | | Facebook | | Source | ---> | NGINX | ---> | stunnel | ---> | Live | |____________| |____________| |____________| |____________| That's all there is to it. Hope this helps out on pushing your streams securely to rtmps servers.2 points
-
What is Docker? Docker is a tool designed to make it easier to create, deploy, and run applications by using containers. Containers allow a developer to package up an application with all of the parts it needs, such as libraries and other dependencies, and ship it all out as one package with the full os included so everything configured works right out the box. Getting Started with installing Docker Windows / Mac OSX / Linux WINDOWS AND MAC USERS INSTALL DOCKER (STAND ALONE) : Download & install on Windows or Mac NOTE: With Docker Desktop you get Docker Engine, Docker CLI with Docker Compose plugin as well as other components and tools. You can also install Docker to Virtualization Software. Install Docker onto a VM (Virtual Machine) in VMWare Workstation (Paid) or VirtualBox (Free) or Docker (Free) You may also use Cloud Providers Machines such as Digital Ocean, AWS, Google Cloud, Microsoft Azure or M1-Serverz to create a machine in the cloud but may be costly.. We recommend having enough CPU, Memory, & Bandwidth Resources to achieve stable streaming on the same PC. If you do not know how to install Ubuntu Server to VMWare Workstation, VirtualBox, & Docker, Check the links below: How to install Ubuntu Server to VMWare Workstation Purchase: VMWare Workstation How to install Ubuntu Server to VirtualBox Download: Virtualbox How to Install Ubuntu Server to Docker Desktop Download Docker Desktop NOTE: DOCKER DESKTOP UPDATED THERE SUBSCRIPTION LICENSE THIS MAY AFFECT WINDOWS USERS USING DOCKER DESKTOP. CLICK HERE FOR MORE INFORMATION Download Ubuntu Server OS Latest GETTING STARTED Once your Virtualization Software is installed, & you have created a VM (Virtual Machine) with the latest Ubuntu Server operating system installed on your VM Login to your VM INSTALL DOCKER curl -fsSL https://get.docker.com/ | sh NOTE: for windows Hyper-V will be enabled via the software install. Virtualization must be enabled via BIOS for Docker Desktop to work. Check if docker is running & its version ON WINDOWS Open Windows Powershell LINUX or MAC OSX - Use your preferred Command Line / Terminal tool on Linux or Mac OSX. Check if dockers daemon is running docker Check your docker version docker -v What is Docker Compose? Compose is a tool for defining and running multi-container Docker applications. With Compose, you use a YAML file to configure your application’s services. Then, with a single command, you create and start all the services from your configuration. MANUALLY INSTALLING DOCKER COMPOSE install Docker Compose sudo curl -L "https://github.com/docker/compose/releases/download/v2.24.7/docker-compose-$(uname -s)-$(uname -m)" -o /usr/local/bin/docker-compose Apply executable permissions to the binary: sudo chmod +x /usr/local/bin/docker-compose Check your docker compose version docker-compose -v Upgrade Docker Compose to the Latest Version via Shell Script. wget https://raw.githubusercontent.com/MurderousOne/nginx-rtmp-ffmpeg-docker/main/upgrade-docker-compose Apply executable permissions to the shell script chmod +x upgrade-docker-compose Now lets run our script to Install Docker Compose / Upgrade Docker Compose ./upgrade-docker-compose Check your docker compose version docker-compose -v To install Docker Compose on other non linux based operating systems such as Mac, Windows, Windows Server, Click Here. NOTE: Docker Desktop for windows & mac may have Docker Compose Pre-installed. Downloading and Creating your container Using docker-compose (Ubuntu Server Image) Create a new Directory mkdir nginx-rtmp Create a Docker Compose file inside your new directory: (example: docker-compose.yml) Change Directory cd nginx-rtmp Create the docker compose file: nano docker-compose.yml Add the code below and save version: "3.9" services: nginx-rtmp-streaming-server: image: murderousone/nginx-ffmpeg-rtmp:ubuntu-latest volumes: - nginxconfig:/usr/local/nginx/conf/ container_name: m1gc-nginx-rtmp-server restart: unless-stopped stdin_open: true tty: true ports: - "80:80" - "443:443" - "1935:1935" volumes: nginxconfig: NOTE: For Raspberry Pi4 Users, use Rasbpberrypi4 image. (Example: image: murderousone/nginx-ffmpeg-rtmp:ubuntu-arm64) Check out our NGINX/RTMP Streaming Server Docker Image from Docker Hub for more information. Docker image is a Ubuntu Server x64 and Ubuntu Server ARM x64 base os which contains all the configuration M1 created for NGINX/FFMPEG streaming using a x2 PC Stream / Gaming setup The docker image is also unlocked and contains pre-made bash scripts to run your streaming server even easier than our manual setup. It will be pulled into your system with nginx/ffmpeg/rtmp streaming server preconfigured. Docker also allows better performance and less resources to your computer / server. # To Create, and Start the container docker-compose up -d Above docker command will pull the image, create, run and start the Docker Container / Streaming Server already configured with enabled ports opened. Here's a Tutorial Video of the Install Process START THE RTMP SERVER ./start-rtmp EXIT THE CONTAINER WHILE LEAVING IT RUNNING HOLD: CRTL + p + q Your docker streaming server is now started and running in the background... You can now connect to it, using your preferred streaming software. (OBS Studio, XSplit Broadcaster, vMix, Streamlabs OBS, etc) To update the container with Docker Compose: # Pull the latest image / update docker-compose pull # To Create and Start the container docker-compose up -d Stop containers and removes containers, networks, and images created by Docker-Compose up docker-compose down NOTE: IF YOU UPDATE THE DOCKER IMAGE TO A NEW VERSION, DOCKER COMPOSE WILL RECREATE THE DOCKER CONTAINER WITH THE NEW IMAGE UPDATES. WHEN DOCKER COMPOSE RECREATES THE DOCKER CONTAINER, ANY CONFIGS CHANGES MADE TO THE CONTAINER WILL NOT BE DELETED DUE TO THE VOLUME. VOLUMES WILL BACKUP YOUR CONTAINER NGINX COFNIG CHANGES AND WILL REQUIRE A VOLUME DELETE TO GO BACK TO DEFAULTS. List and Delete Volumes List Docker Volumes docker volume ls Delete Docker Volumes docker volume rm volume_name volume_name YOU CAN EXECUTE SCRIPTS FROM OUTSIDE THE CONTAINER WITHOUT ATTACHING USING DOCKER EXEC docker exec nginx-rtmp-server ./restart-rtmp OR Attach to the Running RTMP Docker Container NOTE: THE IMAGE COMPLETELY TRANSPARENT / INSPECTABLE / ATTACHABLE / SIMPLE U CAN EDIT, UPDATE, INSPECT THE FULL OS / MAKE ANY CHANGES OF YOUR OWN. docker attach nginx-rtmp-server # To Destroy the Container docker-compose down Setting up main gaming computer to stream to NGINX / RTMP Main gaming computer Any ol Gaming PC with OBS Studio & NVENC encoding. In OBS, i use NVENC encoding and I use my monitor’s native resolution (1080p). Using OBS Studio, in your broadcast settings you need to use the “Custom” streaming service. The Streaming URL will be something like rtmp://192.168.1.100/live (Use your own server’s IP). Your Stream Key needs to be the same you used in your nginx configuration. (Example: KEYNAME-YOU-SET) In the Encoding, use NVIDIA NVENC (Since it doesn’t use a lot of CPU). Bit-rates Click here for Live encoder best settings for bit-rates, and resolutions You may need to reduce your bit-rate depending on services bandwidth limits. You may need to adjust your max bit rate according to your needs and capabilities AUDIO As for Audio encoding, I use the AAC codec, 160 bit rate and a Format of 44 or 48 Khz. * RTMP Video on demand FLV/MP4, playing from local filesystem or HTTP * Stream relay support for distributed streaming: push & pull models * Recording streams in multiple FLVs * H264/AAC support * Online transcoding with FFmpeg * HTTP callbacks (publish/play/record/update etc) * Running external programs on certain events (exec) * HTTP control module for recording audio/video and dropping clients * Advanced buffering techniques to keep memory allocations at a minimum level for faster streaming and low memory footprint * Proved to work with Wirecast, FMS, Wowza, JWPlayer, FlowPlayer, StrobeMediaPlayback, ffmpeg, avconv, rtmpdump, flvstreamer and many more * Statistics in XML/XSL in machine- & human- readable form ENJOY!
 2 points
 -
Welcome to M1GC, If you are a new member here, welcome to the site, If you wish to create a post in any thread to contribute and share any information regarding said thread, Feel free.. Please keep all post content related to subjects / threads and avoid spamming at all cost's.... Be sure to check out our M1GC Clubs & M1GC Discord, How our M1GC Clan runs: M1GC Crews | Discord | Ranking | Clubs | Forum Rules Feel free to join our M1GC Clubs & Discord and link up with other members to game with. If your under 18 years of age, please have your parents permission or supervision to view the content on the website. Share, Like, Follow and Recruit as many members as you wish as this will be your start to joining one of our M1GC Clubs. Were still working on recruiting new members but we are steadily growing and have a scatter group of players.... Check out M1GC Clubs members we have recruited so far. Once we have enough member per game / club, we will reach out to leaders to start events etc..2 points
-
[M1GC] WarPath – [NYC] Noob Friendly [ENG] – M1-Gaming Crew Please note: Server name and IP does change frequently.. GAME MODE DETAILS: The area has fallen to the enemy, and it is up to you to take it back. Embark with your teammates on a persistent campaign that will span several weeks of real time to liberate all the major cities of the area. Experience a massive CTI campaign with up to 200 different capture-able settlements across the entire area Cooperative game-play for up to 64 players A commander role to take care of the planning, production, logistic and AI commanding Recruit-able AI troops to fill the gaps Buy troops and vehicles using three different types of resources Build the FOB of your dreams with an in-game "what you see is what you get" system Fight aggressive and cunning hostile forces who react and adapt to your actions Learn that every window is a threat thanks to the custom urban combat AI Accomplish meaningful secondary objectives that will benefit your progression Never lose your progress with the built-in server-side save system The server will remain public, and can be used for our M1GC members crew and the public for practicing and plain ol arma 3 fun. Please note: There may be random players, If you experience any issue, Please be sure to contact us asap so we may initiate any kicks or bans to avoid future discrepancies... Check the [M1GC] Arma 3 Dedicated Server stats & mods we use here. Were proud to announce we now have a Dedicated Arma 3 Server! Thanks to the awesome work by MuRdeRoNYoBloCk, We now have a up and running Dedicated Server in Arma 3 Feel free to join and have fun. The server will remain public, and can be used for our M1GC members crew practicing with public players. Please note: There may be random players, If you experience any issue, Please be sure to contact us asap so we may initiate any kicks or bans to avoid future discrepancies... Check the [M1GC] Arma 3 Dedicated Server stats & mods we use here1 point
-
Basic Commands for All Players Press T to open chat. Banking /givecash - gives the player an amount of cash Cityhall /drivinglicense - give player a license after a driving test Binds /binds - allows you to set customs key binds Diving /divingsuit - uses the diving suit Doorlock /newdoor - opens UI for creating new door /doordebug - debug for doorlocks Drugs /newdealer - creats a new dealer at a location (front door of house) /deletedealer - deales a saved dealer /dealers - show list if info on dealers /dealergoto - teleport to dealer Garbage /cleargarbroutes - removes garbo routes for user Hotdogjob /removestand - removes a hotdog stand Housing /decorate - opens decorate menu/options /createhouse - creates a house at location /addgarage - adds garage at location /ring - rings a doorbell at location Hud /cash - displays current cash amount /bank - displays current bank amount /dev - displays a dev icon Inventory /resetinv - resets inventory on stash/trunk/glovebox /rob - robs closest player /giveitem - gives item to a player /randomitems - gives random items to a player Lapraces /cancelrace - cancel the current race /togglesetup - turn on or off race setup Mechanicjob /setvehiclestatus - sets the vehicles status /setmechanic - give someone the mechanic job /firemechanic - fire a mechanic Multicharacter /logout - logout of current character /closeNUI - closes the multicharacter NUI Newsjob /newscam - gives player a a news camra /newsmic - gives player a news microphone /newsbmic - gives player a boom microphone Phone /setmetadata - sets the players metadata /bill - sends a bill* /invoice to player RadialMenu /getintrunk - Gets in the trunk /putintrunk - puts a player in the trunk (kidnap) Smallresources /resetarmor - resets the armor /resetparachute - resets a parachute /testwebhook - test to see if webhook for logs is working /id - displays your id Streetrace /createrace - starts a street race /stoprace - stops current street race /quitrace - quits the current street race /startrace - starts the current street race Towjob /npc - Toggles a tow job from a npc /tow - puts closes vehicle on flatbed (must be behind truck) Traphouse /multikeys - gives keys to another player Vehiclefailure /fix - fixes current vehicle Vehiclekeys /engine - toggles engine on/off /givekeys - gives keys to a player /addkeys - adds keys to that player /removekeys - removes keys from player Vehicleshop /transferVehicle - gift or sell your vehicle to someone Weapons /repairweapon - repairs a weapon1 point
-
Due to Limited Player Base, Were pulling the Ground Branch Server Down! We will keep all files available just in case we wish to restore the server if we have more players available.1 point
-
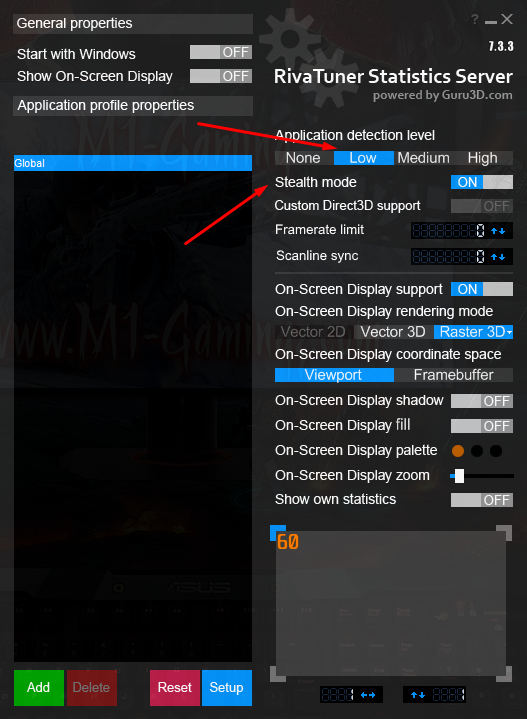
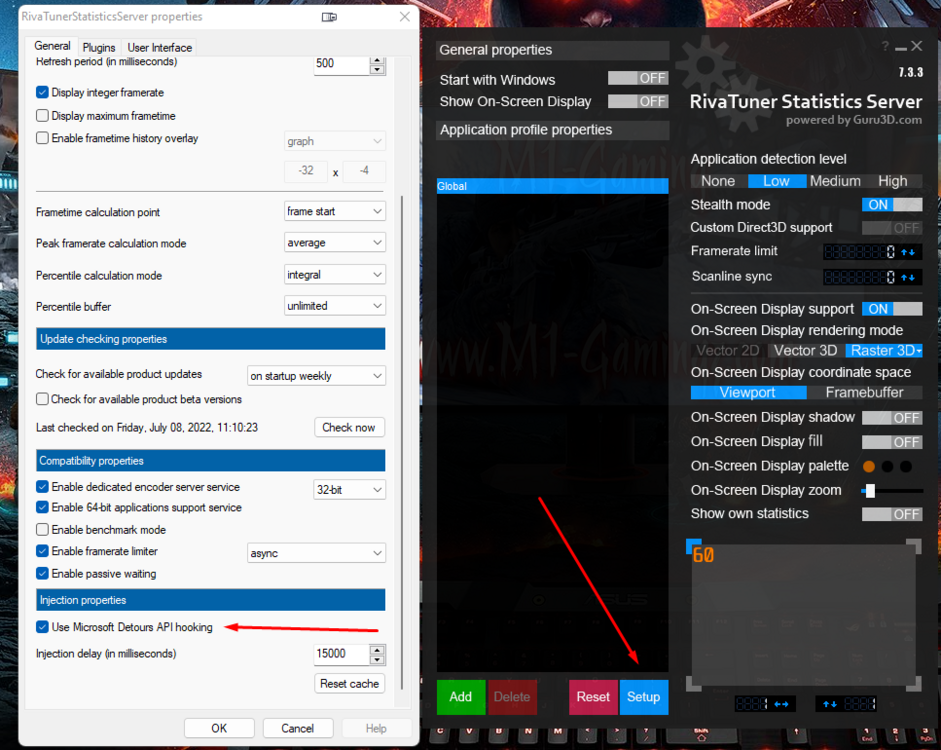
When using MSI Afterburner / Rivatuner to view your CPU, GPU, Ram, FPS, etc during your stream, Riva may cause your obs studio to become blank for certain games. To fix, Open Rivatuner, Set your Application detection level to LOW and turn STEALTH MODE ON Next, Click on Setup and Enable Use Microsoft Detours API Hooking. That's it. You can now use OBS Studio and MSI Afterburner with Rivatuner and no more blank screen.
.thumb.jpg.f4c8576dad5b9a020b24fcb42f60608a.jpg)
 1 point
 -
Please do not spam the board with external links to non gaming related content or redirects. You will be immediately banned indefinitely.1 point
-
Setting Controller in pairing mode Joy Con / Switch Pro Hold down the sync button until the controller LEDs enter a back n’ forth pattern. DualShock / DualSense Hold at the same time the PS + Share buttons until the lightbar starts flashing in a heartbeat pattern. Sony DualShock 4 USB Wireless adapter The official adapter from Sony supports only 1 controller, but allows the headphone jack to be used wireless for both audio and mic. To pair a DualShock 4 to it, both must be set to pairing mode. For the Wireless Adapter, its main body must be slightly pressed towards the USB port (until a “click” is felt) then hold it down in this position for 3 seconds, with its LED flashing in a heartbeat pattern indicating that it’s in pairing mode. Set then DualShock 4 into pairing mode (check the previous section) and it it should connect to the adapter. Final Checks Assuming everything is working as expected then DS4Windows should have no trouble detecting your controller, just make sure you haven’t accidentally stopped DS4Windows (in case you have, just press DS4Windows’ start button) If for whatever reason DS4Windows is failing to detect your controller or you are not sure if it has been properly connected, check the Controller Detection troubleshoot page.1 point
-
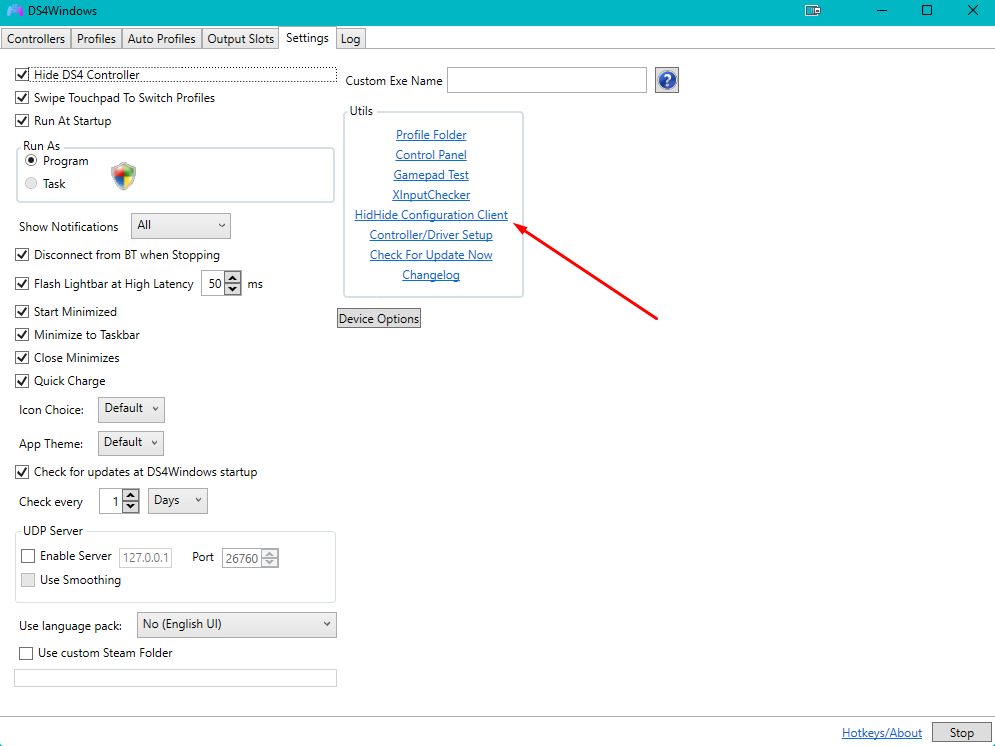
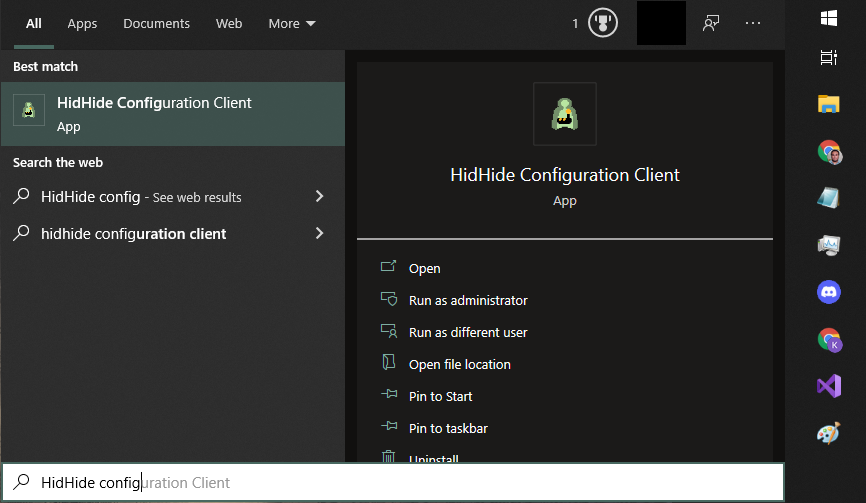
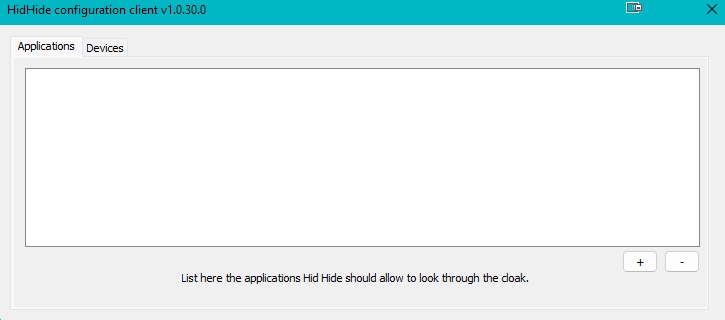
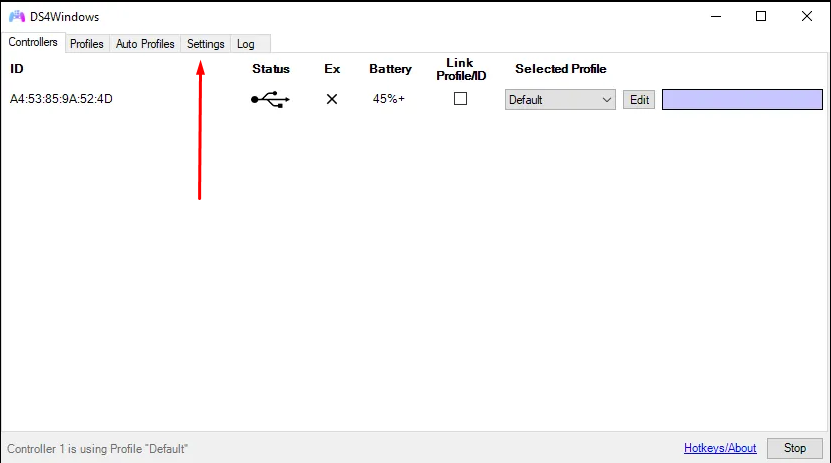
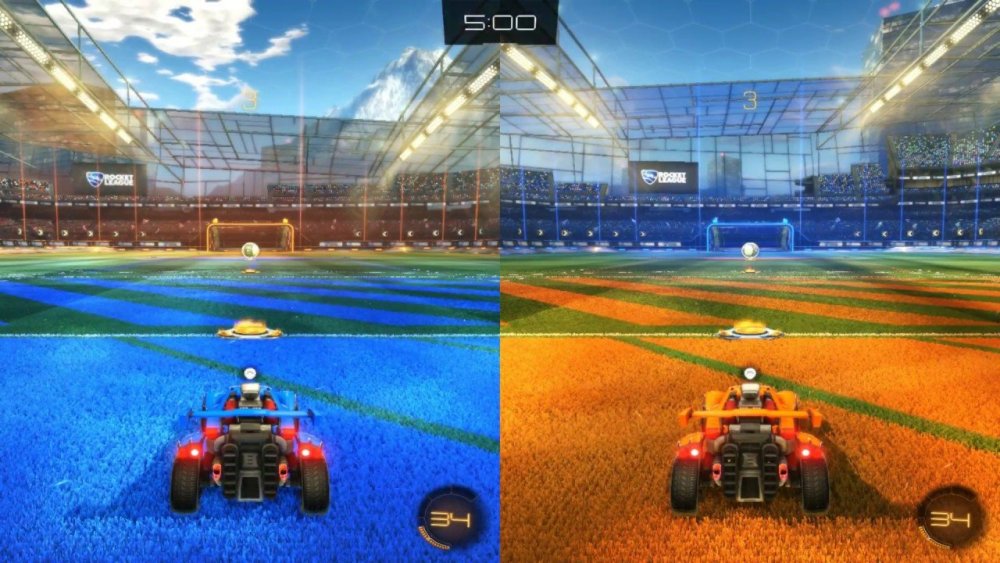
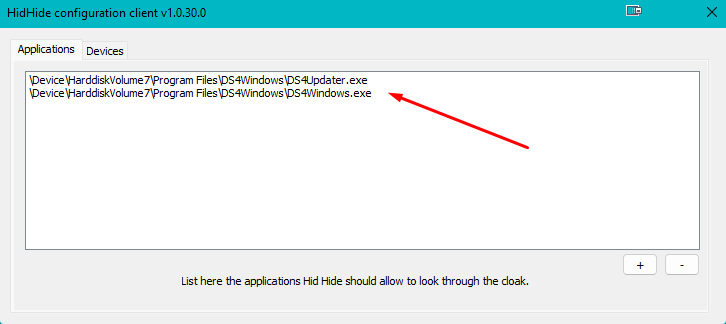
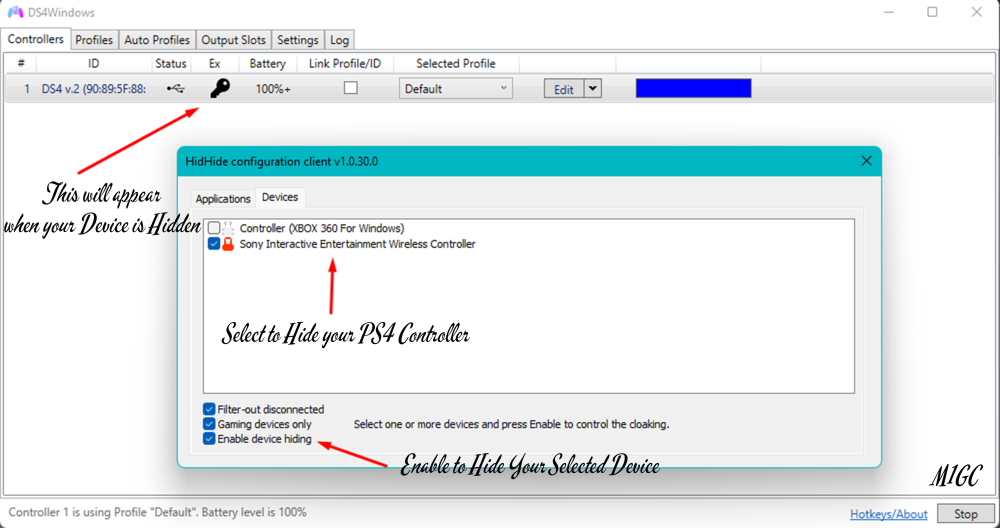
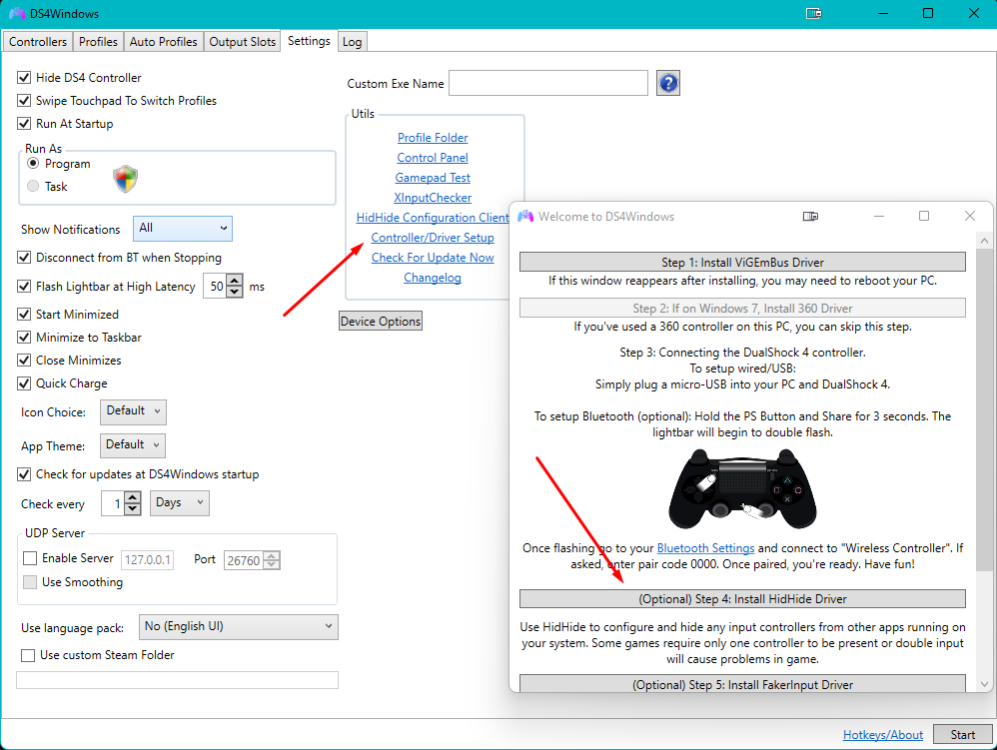
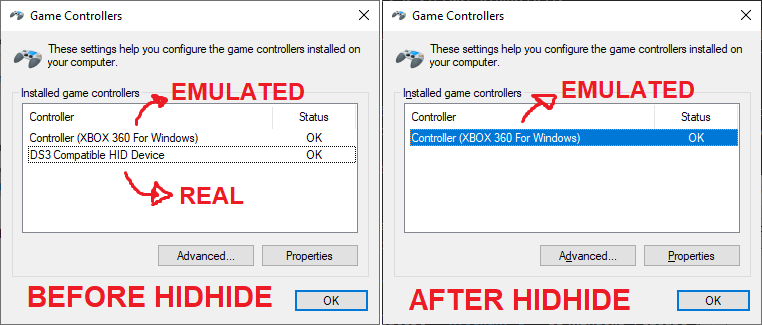
(DS4Windows), creates a virtual controller (Xbox360) & our original controller (PS4 / wireless controller / etc) sends the input to the virtual one which the games can recognize as a controller than can be used. The problem on certain games, usually co-op, split screen games, where more than 1 player is allowed to play on the same system, connecting a controller will show/display x2 controllers for 1 player. When using a controller with DS4Windows, it's highly recommended that the REAL controller is hidden from everything on the system besides DS4Windows itself, in order for only DS4Windows' VIRTUAL controller to remain visible to games. This is necessary to prevent the Double Input Issue. To fix the double input issue, ds4windows has a prebuilt in program called hidhide, which when you setup ds4windows, you may have installed it, If you haven't, You can install it, by clicking Setting's in DS4Windows, Followed by clicking Controller/Driver Setup to install HidHide. With HidHide it is possible to deny a specific application access to one or more human interface devices, effectively hiding a device from the application. In layman's HidHide, allows you hide your original controller (PS4/DS4), and only displays the virtual one (Xbox360/Dualshock4). In DS4Windows, Open HidHide Configuration Client in DS4Windows NOTE: If HidHide link does not open via DS4Windows, Try using alternative methods below. Method: 1 Open HidHide via Windows Search: Type: HidHide Configuration Client Method 2: Manually visiting HidHide installation folder. Default HidHide installation folder: C:\Program Files\Nefarius Software Solutions e.U Open the HidHideClient.exe to open the HidHideClient Configuration Client. HidHide Configuration Client Lets add DS4Windows application, to allow HidHide to use the Cloak. Optional: Adding of the DS4Windows Updaters is not needed. NEXT, let's hide our PS4 Controller and only allow our virtual one. We added the Sony PS4 controller to hidhide, Now in game, The virtual controller will only display. DS4Controller / Wireless Controller / Etc is no longer being shown. This will eliminate any issues with double controller and double input issues. Hope this helps out..... M1

 1 point
 -
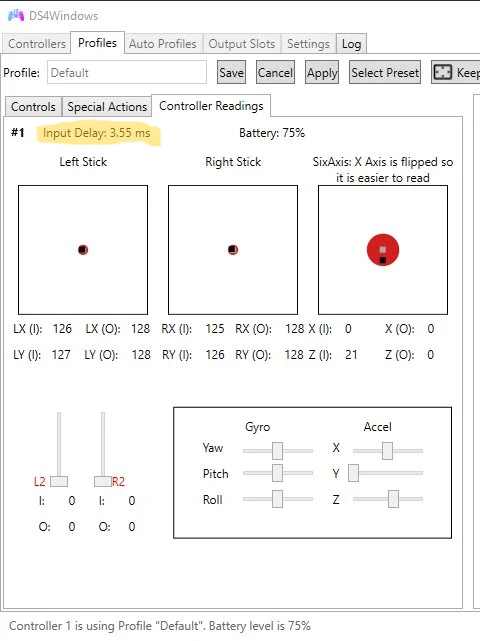
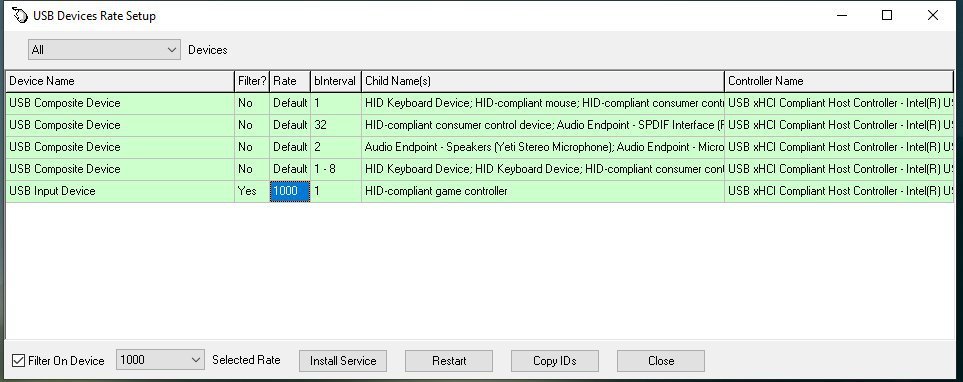
This reduced my input lag from 3.5 to 0.4 in DS4Windows To begin, were going to overclock our controller. You can overclock your controller using hidusbf Download hidusbf from github Extract the hidusbf folder contents to a folder on your computer. (Ignore / Do not extract hidusbfn) inside the driver folder run the setup.exe to open USB Devices Rate Setup. Select All or USB up top left to find your usb controller. Find your controller in the list, Select it / Highlight it, Then install service, Then Check Filter on Device, Next change to 1000, and Click Restart or Disconnect the controller. Replug the controller to complete. Close USB Devices Rate Setup. That's it, Check your latency on DS4Windows

 1 point
 -
Like those other DS4 tools, but sexier. DS4Windows is an extract anywhere program that allows you to get the best DualShock 4 experience on your PC. By emulating an Xbox 360 controller, many more games are accessible. Other input controllers are also supported including the DualSense, Switch Pro, and JoyCon controllers (first party hardware only). This project is a fork of the work of Jays2Kings which Jays2Kings seem's has been abandoned. You can find the old project website at ds4windows.com if it is still available. Downloads Main builds of DS4Windows The .7zip package is smaller but requires the 7zip software in order to open/extract it Extract the package in a easily accessible folder (e.g.: Desktop, Documents, Download etc) DO NOT extract it inside a folder the requires elevated privileges (e.g.: Program Files, Windows) Execute the DS4Windows.exe file to run DS4Windows On first launch DS4Windows may ask you where to save its user data (settings and profiles): AppData folder (recommended): user data is stored outside of the program folder, inside a special folder reserved to your Windows user Program folder: user data is stored inside the same folder DS4Windows.exe is located. Requirements Windows 10 or newer (Thanks Microsoft) Microsoft .NET 5.0 or higher Visual C++ 2015-2019 Redistributable. x64 or x86 ViGEmBus driver (DS4Windows will install it for you) Microsoft 360 Driver (link inside DS4Windows, already installed by Windows if you've used a 360 controller before) Sony DualShock 4 or other supported controller Connection method: Micro USB cable Sony Wireless Adapter Bluetooth 4.0 (via an adapter like this or built in pc). Only use of Microsoft BT stack is supported. CSR BT stack is confirmed to not work with the DS4 even though some CSR adapters work fine using Microsoft BT stack. Toshiba's adapters currently do not work. Disabling 'Enable output data' in the controller profile settings might help with latency issues, but will disable lightbar and rumble support. Disable PlayStation Configuration Support and Xbox Configuration Support options in Steam1 point
-
Tried your approach (How to Secure NGINX/RTMP stream to Facebook using Stunnel) but when I went to start stunnel, I got this output: [ ] Clients allowed=500 [.] stunnel 5.56 on x86_64-pc-linux-gnu platform [.] Compiled with OpenSSL 1.1.1c 28 May 2019 [.] Running with OpenSSL 1.1.1f 31 Mar 2020 [.] Threading:PTHREAD Sockets:POLL,IPv6,SYSTEMD TLS:ENGINE,FIPS,OCSP,PSK,SNI Auth:LIBWRAP [ ] errno: (*__errno_location ()) [.] Reading configuration from file /etc/stunnel/stunnel.conf [.] UTF-8 byte order mark not detected [ ] "/etc/stunnel/conf.d/." is not a file [ ] "/etc/stunnel/conf.d/.." is not a file [.] Reading configuration from file /etc/stunnel/conf.d/fb.conf [.] UTF-8 byte order mark not detected [.] FIPS mode disabled [ ] Compression disabled [ ] No PRNG seeding was required [ ] Initializing service [fb-live] [ ] Ciphers: HIGH:!aNULL:!SSLv2:!DH:!kDHEPSK [ ] TLSv1.3 ciphersuites: TLS_CHACHA20_POLY1305_SHA256:TLS_AES_256_GCM_SHA384:TLS_AES_128_GCM_SHA256 [ ] TLS options: 0x02100004 (+0x00000000, -0x00000000) [ ] No certificate or private key specified [!] error queue: ../crypto/x509/by_file.c:199: error:0B084002:x509 certificate routines:X509_load_cert_crl_file:system lib [!] error queue: ../crypto/bio/bss_file.c:76: error:2006D080:BIO routines:BIO_new_file:no such file [!] SSL_CTX_load_verify_locations: ../crypto/bio/bss_file.c:69: error:02001002:system library:fopen:No such file or directory [!] Service [fb-live]: Failed to initialize TLS context [ ] Deallocating section defaults Just wondering what I may have done wrong, thought I had followed your instructions exactly, but may have forgotten something. Any suggestions?1 point
-
STUNNEL ERRORS [ ] No certificate or private key specified [!] error queue: ../crypto/x509/by_file.c:199: error:0B084002:x509 certificate routines:X509_load_cert_crl_file:system lib [!] error queue: ../crypto/bio/bss_file.c:76: error:2006D080:BIO routines:BIO_new_file:no such file Stunnel will require a ssl certificate to connect encrypted. I noticed, the actual error is indicating you do not have a SSL CERTIFICATE. I marked your reply, with all Green for working config in your logs, and Red to indicate what is causing stunnel not to start. The fb.conf config is pointing to a ssl cert, but it doesn't seem to exist in the directory according to the error. This ssl certificate may have been left out of the tutorial process, assuming the config was already in this directory during install. I have updated the tutorial and added the instructions on how to add the ssl cert to rid these errors. Instructions will contain information on how to create your own using letsencrypt, openssl, and Mozilla CA Authority Certificate Store, Choose one you wish to use, and add it to the config. I Tested all 3, all are working without any errors... Adding a certificate file, authority, and it's cert locations to the fb.conf should remedy the certificate error. Click this link to return to the tutorial which will have updates on how to create a ssl certificate for stunnel. Then retry to Start the Stunnel Server. Keep me posted / Reply to this thread if you remedy the errors, or if you experience any additional errors.1 point
-
Supported Operating Systems Windows Running a Ground Branch dedicated server is only officially supported on Windows at this time. Linux We plan to support running a dedicated server on a Linux some time in the future. We need to sort out potential issues with various plugins we currently use. Linux via Proton / Lutris While it has been confirmed that the game will run under Proton, we have no idea about the server. Mac There are no plans to support running a dedicated server on a Mac. Ports Make sure that your Windows firewall and router are configured to open the following ports: 7777 UDP 27015 UDP Stand alone Dedicated Server A stand alone version of the dedicated server can be obtained using SteamCMD and the appid 476400. For information on downloading and installing SteamCMD, please visit the official page: SteamCMD - Valve Developer Community The command used to download the server is as follows: steamcmd +force_install_dir <InstallDirectory> +login anonymous +app_update 476400 +exit Note: You will need to replace <InstallDirectory> with the directory of your choosing. For instance, to install the dedicated server to c:\gbserver: steamcmd +force_install_dir c:\gbserver +login anonymous +app_update 476400 +exit Starting a server Batch File The easiest way to start the server is to use the included batch file: <Steam Library Location>\steamapps\common\Ground Branch\DedicatedServer.bat For example: C:\Program Files (x86)\Steam\steamapps\common\Ground Branch\DedicatedServer.bat It will automatically find the correct server binary and automatically restart the server if required. Command Line To manually run a server, use the command line: GroundBranchServer-Win64-Shipping.exe <optional map & mission>?<option>?<option> <setting> <switch> The recommended command line is : GroundBranchServer-Win64-Shipping.exe ?MaxPlayers=8?MaxAI=30 MultiHome=X.X.X.X Port=XXXX QueryPort=XXXX -log By adding the MaxPlayer & MaxAI values directly to the command line, it ensures they are set globally, regardless of admin command, voting or game settings. This binary is located in: <Steam Library Location>\steamapps\common\Ground Branch\Binaries\Win64\ Startup Flow Commands Description Maplist If a maplist is present, the server will automatically begin using it upon startup. <MapName>?Mission=<Mission Name> If no maplist is present, any map and mission combination specified in the command line will be used. Note: If either option is missing from the command line, Server Default will be used instead (see below). For example: SmallTown?Mission=IntelRetrieval Server Default If both the above fail, the server will use a map name Server Default, which displays a message to all prompting the admin to create a valid map list. Command Line Options Command line options can be added after the map name. Options must be prefaced with ? and the value must be set using =. For example: GroundBranchServer-Win64-Shipping.exe SmallTown?Mission=IntelRetrieval?MaxPlayers=8 -log Commands Description Mission Required when specifying a map via the command line or in a maplist entry. Tells the game which mission to use. Missions contain information about which game mode script to run as well as any associated actors. Available missions vary from map to map, but by default may include: Deathmatch, IntelRetrieval, TeamElimination, TerroristHunt, Uplink. To manually see which missions are available for what map, look in the following directory: GroundBranch\Content\GroundBranch\Mission MaxPlayers Maximum amount of players this server should allow (8-16) Currently, there is hard limit of 16 for dedicated servers. We recommended a maxium of 8 for coop and 16 for PvP. MaxAI Absolute limit of any AI used in any game mode (0-50). Note: Setting this to 0 would essentially prevent cooperate game modes from working. TimeOfDay Time of day in military time. 0000-2400 TimeLimit After how many minutes until the game ends and the map changes (0+ min) ReadyCountdownTime Delay between declaring ready and everyone being sent to the play area in seconds (5+) PreRoundWaitTime How long keep people frozen before the round begins in seconds (5+) RoundTime How long each round should last in minutes (3+) PostRoundWaitTime End of round delay before everyone is sent back to the ready room in seconds (5+) OpForCount How many AI to spawn in the Intel Retrieval or Terrorist Hunt (1-MaxAI) Difficulty What settings to use for any AI in Intel Retrieval or Terrorist Hunt (1-4, 0 for custom) SpectateFreeCam Can spectators to fly around freely without following anyone? (0/1) SpectateEnemies Can spectators follow members of the enemy teams? (0/1) SpectateForceFirstPerson Should spectators be restricted to first person only view mode? (0/1) Command Line Settings/Switches These are optional arguments that can be used to control various aspects of the engine. The are not case sensitive, but their spelling is important. Settings are key=value pairs. Switches use - prefix. For example: GroundBranchServer-Win64-Shipping.exe TE-PowerStation?RoundTime=10 MultiHome=192.168.1.254 Port=7779 QueryPort=27017 -log Commands Description MultiHome=<ip address> Tells the engine to use a specific IP address for networking. This is only useful if server supports multiple IP's. Port=<number> Tells the engine to use a specific port number. This is only useful if running multiple dedicated server instances on one IP. QueryPort=<number> Tells the engine to use a specific query port number. This is only useful if running multiple dedicated server instances on one IP. -Log Opens console/log contents in new window. Log=<filename.log> Same as -Log, but saves contents to file specified by "filename.log". Map Names 747 Arena Arena2 City Creek Depot Depot_Compound Paintball PowerStation RunDown SmallTown StorageFacility Tanker Automatic Setup If no admins are specified, a file called AdminSetupPassword.txt will be generated the first time the server is started. This file holds a unique password that allows you to become an admin remotely and will displayed in the console window until used. To use, you must connect to the server and type the command admin setup <password> into the console. For example: admin setup 1234asdf Once used, you will be added as a "SuperAdmin" on the server and be presented with the admin menu. Admin Menu The admin menu can be accessed in multiple ways: clicking on the admin button from the escape menu. pressing F8. typing admin into the console. Depending on the level of access, you will have sections for: administrative commands, such as changemap, ban, kick etc. creating or editing maplists. changing server name, message of the day, max players and password. adding or removing admins. Watch a breakdown of "ZooKeeper" admin tool on Youtube (~4min clip) Manual Setup All the .ini files used for configuring the server are located under GroundBranch\ServerConfig. For example: C:\Program Files (x86)\Steam\steamapps\common\Ground Branch\GroundBranch\ServerConfig\Server.ini If no .ini files exist, they will be generated automatically the first time the server is started. Settings are key=value pairs. For example: ServerPassword=password Commenting is done using a semicolon. For example: ; This is a comment. Server.ini --- | --- ServerName | Name of the server (64 characters max) ServerMOTD | The message of the day (512 characters max) <br> = line break. <b> = bold line. <h1 - 3> = heading 1, 2, 3 etc ServerPassword | Password required to join the server. MaxPlayers | Maximum number of players allowed on this server (if not already set by command line) MOTD Example: <h1>Awesome Heading! <br>Another line! <br><b>Some bold text! Admin.ini Contains a list of admin groups and the admins themselves. The admin groups are used to help separate admins into different tiers. For example: An admin that is part of the "SuperAdmin" group can do everything. An admin that is part of the "Moderator" group can only kick, ban or change the map. To add an admin, you need to add a new line based on the following: Admins=(Name="<name>",UniqueId="<SteamId>",ContactInfo="<optional>",Group="<admin group>") For example: Admins=(Name="JoeBlow",UniqueId="12345678901234567",ContactInfo="",Group="SuperAdmin") Note: The :0 (colon zero) that was mentioned in the previous versions of this guide is no longer required. Vote.ini Command Description VoteDuration Hold long a vote will last for. VoteSucceededTimeout How long (in seconds) to wait after a vote has passed before allowing another vote. VoteFailedTimeout How long (in seconds) to wait after a vote has failed before allowing another vote. MinPlayers The minimum number of players required to cast a vote. VotingCommands The commands that can be voted for. For example: VotingCommands=changemap VotingCommands=nextmap VotingCommands=kick MapList.ini Via Admin menu By far the easiest way to creating a map list is via the admin menu. Using the menu you can select a map, configure it's settings and click "add" so that it now appears on the right-slide list. You can repeat this process to add several configured maps/modes into the game roster to play one after another (in the order you add them to the list). Basically this menu is how you generate the MapList.ini (you're seeing in the second half of the screenshot) so it doesn't need to be made manually. However, if you want to manually make the MapList.ini then use the following section as a guide. Manually To create a maplist.ini file manually, create a text file called MapList.ini under /GroundBranch/ServerConfig. Add a section called [/script/rbzookeeper.zkmaplist]. Under this section, add a MapList= entry for each map that you wish to include. Each entry should begin with a map and mission option, followed by any additional options you may wish for that particular map. Note: Any command line option will work here. Coop/PvE example: [/script/rbzookeeper.zkmaplist] MapList=/Game/GroundBranch/Maps/747/747?Mission=/Game/GroundBranch/Mission/747/IntelRetrieval?opforcount=30?difficulty=2?roundtime=60?teamexfil=1?timeofday=0800?timelimit=60?readycountdowntime=60 MapList=/Game/GroundBranch/Maps/City/City?Mission=/Game/GroundBranch/Mission/City/IntelRetrieval?opforcount=30?difficulty=2?roundtime=60?teamexfil=1?timeofday=0800?timelimit=60?readycountdowntime=60 MapList=/Game/GroundBranch/Maps/Creek/Creek?Mission=/Game/GroundBranch/Mission/Creek/IntelRetrieval?opforcount=30?difficulty=2?roundtime=60?teamexfil=1?timeofday=0800?timelimit=60?readycountdowntime=60 MapList=/Game/GroundBranch/Maps/Depot/Depot?Mission=/Game/GroundBranch/Mission/Depot/IntelRetrieval?opforcount=30?difficulty=2?roundtime=60?teamexfil=1?timeofday=0800?timelimit=60?readycountdowntime=60 MapList=/Game/GroundBranch/Maps/PowerStation/PowerStation?Mission=/Game/GroundBranch/Mission/PowerStation/IntelRetrieval?opforcount=30?difficulty=2?roundtime=60?teamexfil=1?timeofday=0800?timelimit=60?readycountdowntime=60 MapList=/Game/GroundBranch/Maps/RunDown/RunDown?Mission=/Game/GroundBranch/Mission/RunDown/IntelRetrieval?opforcount=30?difficulty=2?roundtime=60?teamexfil=1?timeofday=0800?timelimit=60?readycountdowntime=60 MapList=/Game/GroundBranch/Maps/Tanker/Tanker?Mission=/Game/GroundBranch/Mission/Tanker/IntelRetrieval?opforcount=30?difficulty=2?roundtime=60?teamexfil=1?timeofday=0800?timelimit=60?readycountdowntime=60 PvP example: [/script/rbzookeeper.zkmaplist] MapList=/Game/GroundBranch/Maps/Arena/Arena?Mission=/Game/GroundBranch/Mission/Arena/TeamElimination?roundtime=10?timeofday=0800?timelimit=60?readycountdowntime=60?spectatefreecam=0?spectateenemies=0?spectateforcefirstperson=1?useteamrestrictions=1 MapList=/Game/GroundBranch/Maps/Arena2/Arena2?Mission=/Game/GroundBranch/Mission/Arena2/TeamElimination?roundtime=10?timeofday=0800?timelimit=60?readycountdowntime=60?spectatefreecam=0?spectateenemies=0?spectateforcefirstperson=1?useteamrestrictions=1 MapList=/Game/GroundBranch/Maps/747/747?Mission=/Game/GroundBranch/Mission/747/Uplink?roundtime=60?defendersetuptime=30?timeofday=0800?timelimit=60?readycountdowntime=60?spectatefreecam=0?spectateenemies=0?spectateforcefirstperson=1?useteamrestrictions=1 MapList=/Game/GroundBranch/Maps/City/City?Mission=/Game/GroundBranch/Mission/City/Uplink?roundtime=60?defendersetuptime=30?timeofday=0800?timelimit=60?readycountdowntime=60?spectatefreecam=0?spectateenemies=0?spectateforcefirstperson=1?useteamrestrictions=1 MapList=/Game/GroundBranch/Maps/Creek/Creek?Mission=/Game/GroundBranch/Mission/Creek/Uplink?roundtime=60?defendersetuptime=30?timeofday=0800?timelimit=60?readycountdowntime=60?spectatefreecam=0?spectateenemies=0?spectateforcefirstperson=1?useteamrestrictions=1 MapList=/Game/GroundBranch/Maps/PowerStation/PowerStation?Mission=/Game/GroundBranch/Mission/PowerStation/Uplink?roundtime=60?defendersetuptime=30?timeofday=0800?timelimit=60?readycountdowntime=60?spectatefreecam=0?spectateenemies=0?spectateforcefirstperson=1?useteamrestrictions=1 MapList=/Game/GroundBranch/Maps/RunDown/RunDown?Mission=/Game/GroundBranch/Mission/RunDown/Uplink?roundtime=60?defendersetuptime=30?timeofday=0800?timelimit=60?readycountdowntime=60?spectatefreecam=0?spectateenemies=0?spectateforcefirstperson=1?useteamrestrictions=1 MapList=/Game/GroundBranch/Maps/SmallTown/SmallTown?Mission=/Game/GroundBranch/Mission/SmallTown/Uplink?roundtime=60?defendersetuptime=30?timeofday=0800?timelimit=60?readycountdowntime=60?spectatefreecam=0?spectateenemies=0?spectateforcefirstperson=1?useteamrestrictions=11 point
-
Feel free to Create a New Topic in this topic thread if you do not see a Live streaming Platform you use and wish it to be added to the forum. Please Note: You can use the example below on how to submit with your request... EXAMPLE: Live Streaming Platform: Youtube Description: Enjoy the videos and music you love, upload original content, and share it all with friends, family, and the world on YouTube.1 point
-
Want us to add some tools to our list? Feel free to Create a New Topic in this topic thread if you do not see a live streaming tool you use and wish it to be added to the forum. EXAMPLE: TITLE: Adobe Premier LINK: https://www.adobe.com/products/premiere.html Description of Live Streaming tool: Premiere Pro is the industry-leading video editing software for social sharing, TV, and film. Creative tools, integration with other apps and services, and the power of Adobe Sensei help you craft footage into polished films and videos.1 point
-
The world of live streaming has seen an ongoing debate about latency reduction. Upon the arrival of the various low-latency streaming solutions, we want to take some time (ironically) to focus at latency a bit closer. While the discussion has revolved primarily around ultra-low latency solutions employing mainly WebRTC and WebSocket technologies, the “traditional” HTTP-based streaming protocols are still used predominantly for live streaming use cases without any interactive (chat, betting etc.) or real-time elements (video calls). This article discusses what latency is, where and why it is introduced and, most importantly how M1GC is able to help cut down the latency of HLS and MPEG-DASH streams under 10 seconds. From the mere CDN perspective, we used to think of latency as the time it takes for a packet to travel from the origin server to its final destination, the so-called round-trip time. Let's call this phenomenon the network latency. Measured, ideally, in milliseconds, the network latency depends on various factors such as the speed of light, physical distance, transmission rates, network structures and peering policies of autonomous systems involved, last but not least, the network edge infrastructures including our home and mobile internet connections. Glass-to-glass latency Despite its complexity, network latency is just one of the many aspects of entire live streaming latency or, as it is often called, glass-to-glass latency. The latter term refers to the time beginning from the moment an image is captured through the glass lens of a camera until it’s played back on the glass screen of your device. To understand where and why the latency is introduced, let's follow the video signal a bit closer. The glass-to-glass latency countdown begins the very moment when the camera captures an image of our analog world and turns it into a continuous flow of digital data. At the initial stage, the data transfers require large bandwidth capacities (can be Gbit/s and larger). Therefore, the next natural step is to compress the signal using codecs and scale the video bitrates down to values suitable for internet transfer. This process is also known as encoding. Now, when the stream can be transferred over IP, we need to think how to deliver it to viewers effectively. Back in the day, the flash-based RTMP protocol was used to serve this purpose. With Flash being no longer supported by browsers and mobile, however, the HTTP-based workflow was introduced and RTMP is used primarily only as a transport protocol between the encoder and the next unit of the live streaming process - the streaming server. For HTTP-based protocols, the media server breaks the content into small file segments (also called chunks). Each of these segments contains a short interval of the content, normally ranging between 2 to 10 seconds. These chunks are packed within a manifest file which contains the metadata mapping the particular time interval to a specific file segment. At the same time, the server creates copies of the stream in different bitrates and resolution (transcoding) to adapt the stream quality based on users' device and network performance. From there on, the segmented stream travels to global CDN edges where it gets cached and served to users through a player. Each of these units adds certain latency and widens the time gap between the capture and the playback. More specifically, it's a combination of the network latency (encoder > streaming server and the CDN > player), transcoding delay (~5s) and the buffer that both the streaming server and the player create to be able to distribute and play back the stream seamlessly. The latter depends mainly on the chunk duration and may take as much as 10 seconds per each unit. Altogether, the standard HTTP-based protocols offer glass-to glass latency of 25-40 seconds. Low latency. High quality. One might ask why HLS and MPEG-DASH have managed to stick around at times where sub-second latency solutions are being introduced. The answer lies in their easy scalability, wide support across platforms and devices and playback availability without the need of using proprietary applications (player etc.). Simply put, the efforts to bring a smooth and lag-free video watching experience to viewers has taken its toll on the overall latency. We’ve gone through the entire process and we have created a live streaming solution that offers the glass-to-glass latency of HLS and MPEG streams to be lower than 10 seconds while maintaining the uncompromising quality of video delivery.1 point
-
M1GC GTAVRP FiveM Server: https://cfx.re/join/4pzyov (Serious Players / Roleplaying) HOW TO JOIN Must have a legit copy of GTAV... Download FiveM: https://runtime.fivem.net/client/FiveM.exe (FiveM will not get you banned, You can still play GTAV Online) CLICK THE SERVER LINKS TO JOIN OR SEARCH: https://servers.fivem.net/servers (TYPE IN SEARCH: M1GC) Always on 24/7... Still in Development, but both are Playable at the moment!
 1 point
 -
Thanks for Viewing & Be sure to Subscribe to our Youtube Channel to stay updated with upcoming streams. Chat with me on my discord: http://bit.ly/MuRdeRoNYoBloCk-Discord All chat on my discord channel will display in stream. Join my Discord: http://bit.ly/M1-Gaming-Discord Donations are not required, so if you cant donate, just come hang out, enjoy the stream and be sure to show your support in the chat. I def appreciate it. If you do wish to donate, all donations help with improving the stream and content. https://youtube.streamlabs.com/m1gamingz M1-Gaming Crew is also Live on Twitch.tv, Smashcast.com, Youtube.com, Ustream.tv, Stream.me, & Mixer. Follow/Subscribe! Links Below.1 point
-
[M1GC] Crew / Club Specific rules and Guidelines Fun is what we are all here to have whilst playing games. We should all aim to get along with each other. From time to time things may not go as you want, please refrain from over expressing yourself. Baiting or upsetting other members will not be tolerated. Respect is the key foundation of this clan. Respect must be shown to fellow members, the general public, other clans and communities. Members must follow all given rules at all times this includes not abusing any membership perks or admin privileges. Abuse will not be tolerated in any form as it has no place in [M1GC]. Although swearing will be heard in our voice comm's, we do not need to see it written anywhere. Do not use any crass or socially unacceptable language or pictures. Cheating we will take as the most serious of all charges. Any member that has an active ban from BE, VAC, PB etc. will be removed from the clan. Any member caught cheating will be banned and reported to all relevant parties. Using any in-game glitches to your advantage will be classed as cheating. So if you know them, don't use them. If you suspect any player of cheating: Inform a Senior Admin. They will then determine the outcome. Do not attempt to engage in a slagging contest with the player via in-game messages or voice comm's. Remember that in order for our servers to be filled, we need the participation of public players, so fair play is important on our part. Our rules also apply to members who play on other Clan servers, if we are provided with proof of an offense committed on another server we will serve you with a permanent ban. Voice Comms When you are playing on a server, [M1GC] members must be on our discord voice program if on PC. Not being on our voice program will get you kicked from the game server by the Admin. You should ideally be in the channel for the server that you are playing on, with a few exceptions: Other channels should only be used for specific things like training and even then it should be a sub-channel under the correct server channel. There may be other cases when you are playing, but cannot make noise at home, a broken microphone and either a message after your name or use of the AFK channel will be accepted. Being in the Bar if you want to chat (or create a sub-channel). Meeting channels should not be used whilst gaming. We are a mature crew and expect our members to act accordingly, thus swearing is permitted. However, remember to respect the other members in the same channel and do not overindulge in these activities. Refer to the rules on fun. Push to Talk is enforced when members cannot control themselves. Forum Keep yourself up to date with the forums, as all clan information will be posted there. To aid with above rule, all members must visit the forums at least once a month, this is to ensure that you are still with us. Members who have not visited the forums in a 30-day period will be placed in the MIA section of the roster and will lose their member forum and voice program rights. A further 30-day period and they will be removed from the Crew. This is to ensure that we have an up to date Roster and genuine number of Crew members. Username It is a requirement to have your username/display name on all our official channels to be the same, this includes our forums, roster, TS3 & Discord. It also extends to the name you use on our servers, so can include your Steam name. This is to make admin of our users correct and when possible automated. PLEASE NOTE: Due to script restrictions with our SQL databases, we will not allow any non-standardized English alphabet characters in your username, this includes special characters and accents above letters. Numeric numbers 0 > 9 will be accepted. We are sorry about this but we are limited to the available regional settings of the database. Donations to [M1GC] are completely voluntary. Donations are only used to cover the costs of running our website and servers. To encourage donations whenever possible 'perks' are offered to members who donate. Gameplay We expect all [M1GC] members to play fair and in a good manner at all times. Each game we host will have its own specific game rules (So make sure you are up to date with them). What applies to the public players also applies to [M1GC] members, with no exceptions, although we may have some additional rules for members. Members must not use the in-game message tool to abuse others, vent their frustration or accuse anyone of cheating (see rules on cheating). This behavior will result in a kick or ban. If a server is full and you would like to join that game, ask an Admin and they will try to create a slot for you when they have time. For games with reserved slots if you donate, this will not be required. Server Rules All [M1GC] members must follow the server rules. Any [M1GC] members found to be breaking the server rules will be dealt with accordingly. Server Admins All full [M1GC] Admin members will have access to the Server Admin forums and thus will have admin rights on all [M1GC] gaming servers. These forums may be listed on in our Gaming Clubs. This excludes recruits until they have passed their recruitment period. Dependent on server/game, admin rights may be split into different categories. [M1GC] members of a rank between (Private | Pvt) and (Corporal | Cpl) will have basic rights, while members ranked (Sergeant | Sgt and above) will have senior admin rights. Command Staff have access to the server control panel in order to start/stop/update the game servers. Command Staff have access to the server banned player lists. Reserved Slots Dependent on server, reserved slots (or auto-join) will be made available to any member who has donated funds greater than $5 USD in the past 3 months. Clans Hierarchy REMOVED! WILL UPDATE SOON PLEASE NOTE: Our Clans Hierarchy is subject to changes and may be representing our old Clan Hierarchy until updated. Issue Resolution Any problems that do come along, of which there will be a few, firstly try and resolve the issue on a one to one basis. Don’t post on forums in the first instance. If this is unsuccessful, speak to the next person in the chain of command. If the issue is with your next level in the chain of command, go to the next level. Holiday If you are going to be away on holiday or an extended work deployment for more than 2 weeks, please inform a Admin and post in the 'LOA' forum (ensure that you use the correct posting format). If this is for more than 1 month, they will then place you in the Away on Leave section of this roster and will prevent you from being placed in the LOA section. If you do find yourself in the LOA section (normally after forgetting to inform someone), please contact a admin and they will assist you in gaining your access back. Leaving M1GC If you have decided the time to leave [M1GC] has come for whatever reason then all we can say is, have fun and good luck wherever you may end up and we will be sorry to see you leave. All we ask is that you let us know you are leaving and that you leave amicably. Remember to post your resignation in the 'Leaving M1GC' forum section so that all know you have left so any admin and other rights can be removed. Things not to do when leaving: Post anything defamatory as all it will do is be removed and your account will be deactivated without hesitation. Don't abuse your admin rights on the servers by banning people or trying to break the servers. Try to recruit members into a new/different crew. Breaking any of the above rules will automatically end up with you being permanently banned from the Forums, Servers and Discord. If you leave amicably and you let us know that you are creating a new clan then we will temporary ban you for 30 days just to protect ourselves from similar issues that we have had in the past with sour members leaving. We would prefer to have everyone leave amicably and not end up with bad blood. Rejoining M1GC If you have decided to rejoin [M1GC] then if you left on good terms it is a simple process of posting in the 'Information About M1GC' forum section and one of the CS will set you back up. M1GC Crew / Club Specific rules and Guidelines Clan Tags Whilst playing on the [M1GC] servers, all members must wear their tags. If you don't wear them, do not complain when you are kicked. We expect each member to be proud to wear the [M1GC] tags and associate themselves with us, thus whilst playing on other servers we would like to see you wear them, although this is not compulsory. If you are seen using tags other than [M1GC] tags, you will be deemed as having left the clan and be removed. Member Activity All members are expected to take part in the Crew. This means playing in matches together, being in Discord and taking part in the forums. The bare minimum of requirements would be to do your absolutely best to be active every 1-2 weeks on the forums and Discord. If you are inactive for 4 weeks or more you will be flagged for removal and message on the forums or Discord. Depending on your response or no response you will be removed for inactivity. At 45 days of inactivity you will be removed for inactivity. IMPORTANT If you are seen wearing a tag other than [M1GC], you will be removed from the crew. This does not mean that you cannot play with another group/organization/clan/community, it just means that you cannot be a part of the two communities (wear their tags) to prevent any conflict of interest. Actions M1GC members should NEVER do! Do NOT go into a match, planning on Rage quitting or quitting in general. Do NOT go into a match to make other people rage quit (Including M1GC). Do NOT troll the players in matches or any other way shape or form! Do NOT feed a flame troll or any troll for that matter! Do NOT be disrespectful in game chat. You can speak up for yourself, just keep it classy. Do NOT purposefully Team-kill anyone. If you accidentally frag/shoot someone, make sure you apologize. Never do it on purpose during an actual game. Do NOT Team-kill or Loot any M1GC members! Do NOT Use any kind of hacking programs or exploit glitches in any way. Infractions of any of these rules may result in rank demotion and/or removal from M1GC. Please do your best to heed these rules and then we can all just get back to having fun.
 1 point


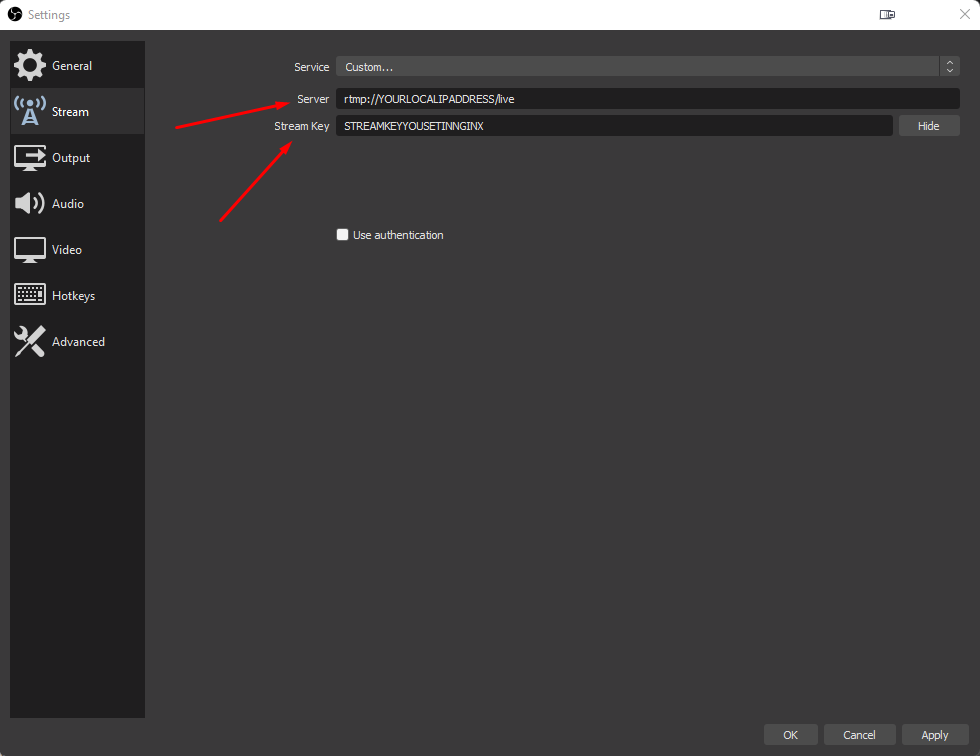
.jpg.8d0834623a992a175ecd7edfd5e125f1.jpg)
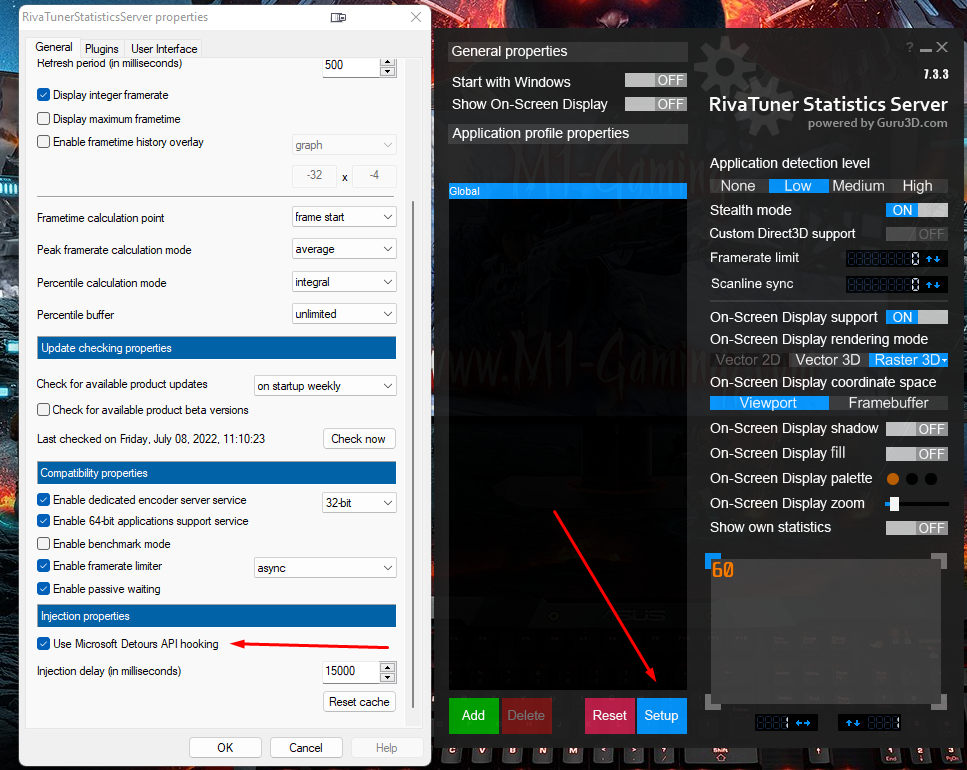


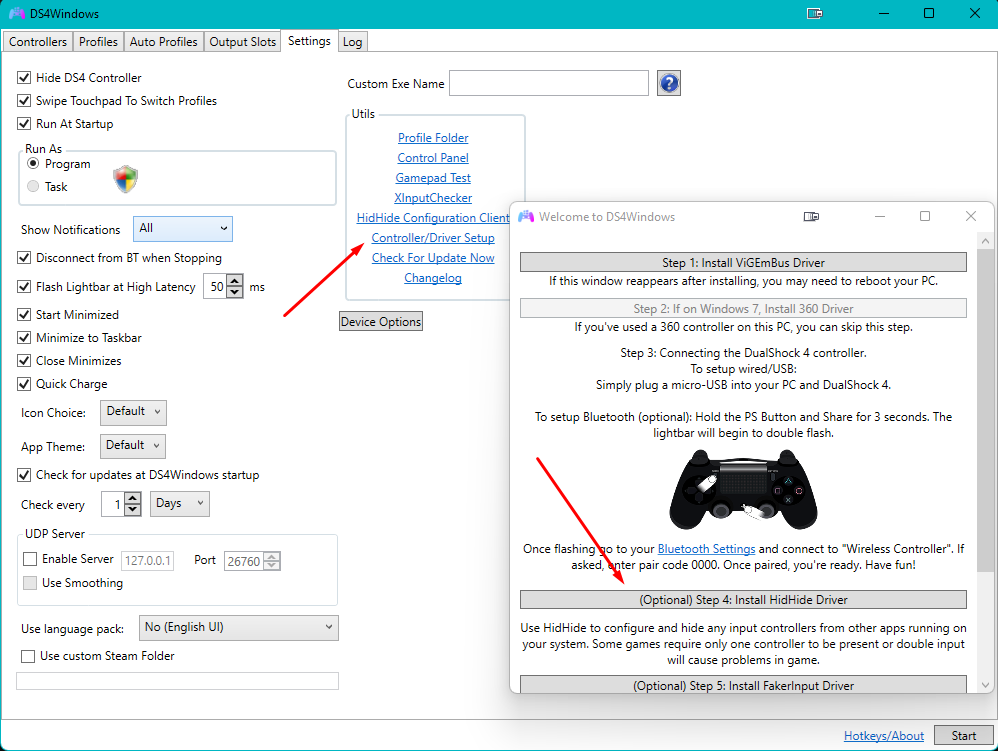
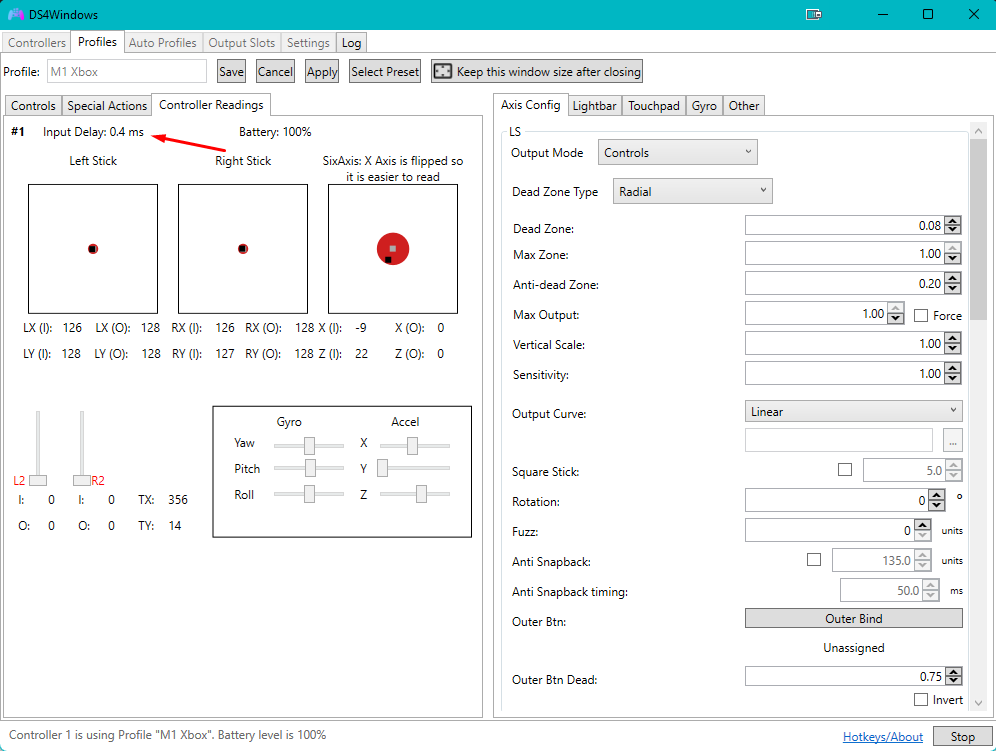


This leaderboard is set to New York/GMT-04:00